 Save
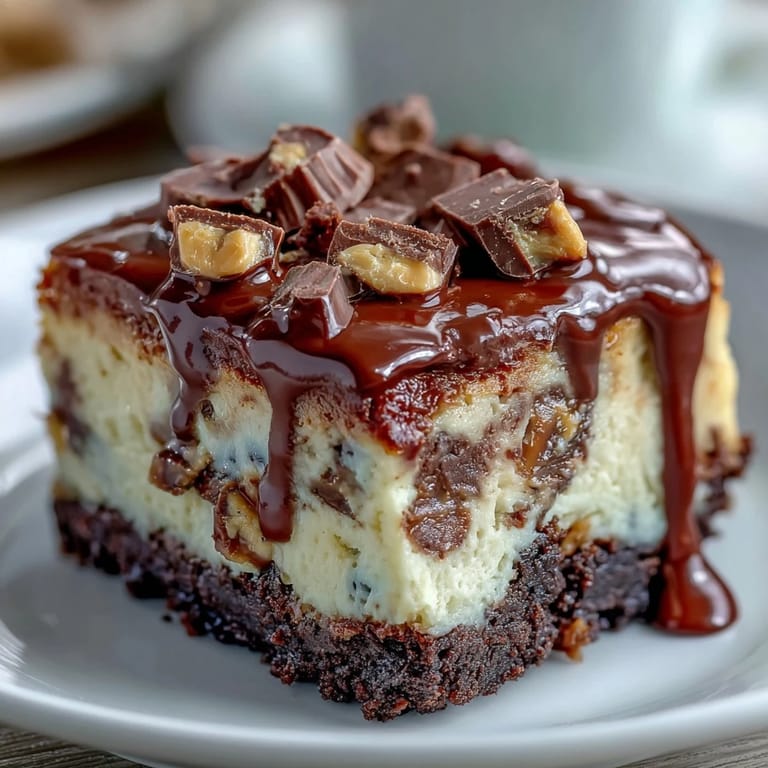
Save My coworker Sarah brought these peanut butter cup cheesecake bars to a potluck last spring, and I watched three people go back for seconds before I even got to try one. When I finally grabbed a slice, that first bite hit different—creamy, nutty, chocolatey all at once, with actual peanut butter cup chunks throughout. I knew immediately I had to figure out how to make them myself, which led to a Saturday afternoon of happy baking accidents and a kitchen that smelled like heaven.
I made these for my partner's birthday dinner with friends, and something magical happened when everyone gathered around the kitchen island afterward. Someone cut into the bars, the knife sliced through that creamy center, and the whole room went quiet for a second—the good kind of quiet where everyone's about to taste something they didn't know they needed. That moment cemented it for me: these aren't just dessert, they're the thing people remember about your dinner.
Ingredients
- Chocolate cookie crumbs (1 1/2 cups): Oreos work beautifully, but scraping out the cream filling is actually worth the extra minute because it keeps the crust crispy instead of soggy.
- Unsalted butter (1/4 cup, melted): This binds everything together and creates that perfect press-in texture—don't skip it even though it seems like a small amount.
- Granulated sugar (2 tbsp for crust): Just a touch adds structure and keeps the crust from feeling like pure chocolate dust.
- Cream cheese (16 oz, softened): Room temperature is non-negotiable here; cold cream cheese creates lumps that no amount of beating fixes, so take it out of the fridge 30 minutes before you start.
- Granulated sugar (2/3 cup for filling): This sweetens the entire experience, so don't cut corners thinking you'll compensate with peanut butter cups.
- Large eggs (2, room temperature): Room temperature eggs incorporate smoothly without creating an odd texture in the baked filling.
- Sour cream (1/2 cup): This adds tanginess that balances all the sweetness and keeps the cheesecake from feeling one-dimensional.
- Creamy peanut butter (1/2 cup): Use the really good kind without added oils; cheap peanut butter makes the whole filling taste thin.
- Vanilla extract (1 tsp): A small amount that rounds out all the flavors beautifully without making anything taste like vanilla cake.
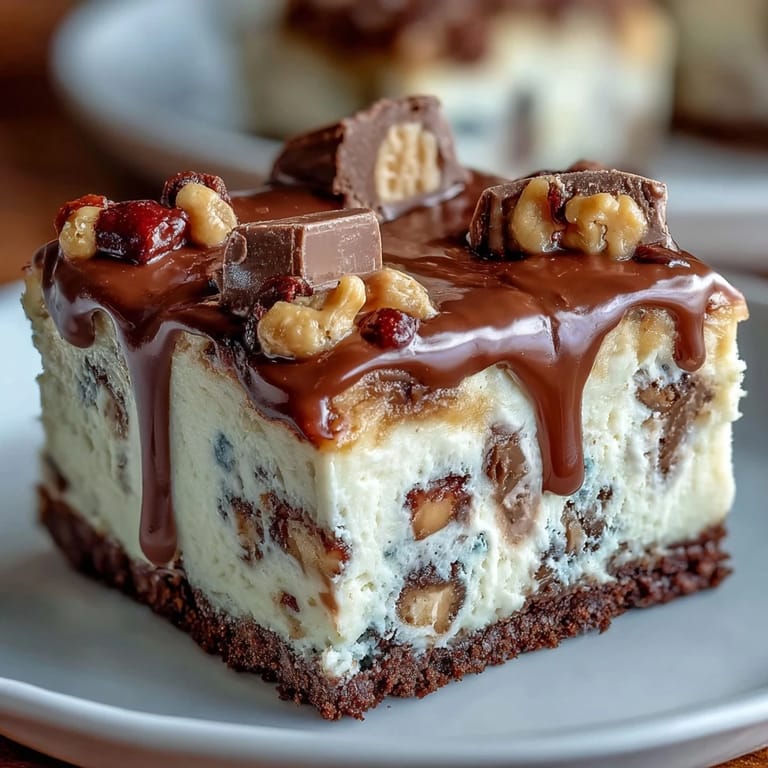
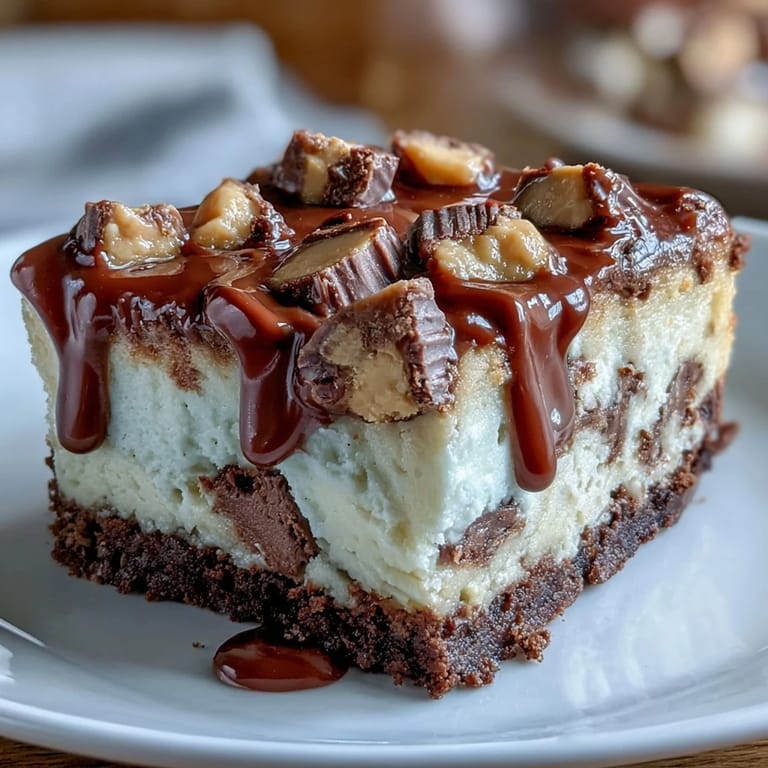
- Mini peanut butter cups (1 1/2 cups, chopped): The star ingredient—chop them roughly so you get actual chunks instead of peanut butter cup dust throughout.
- Semisweet chocolate chips (1/2 cup, optional): These are purely for garnish and add a professional finish, but honest truth is they're optional if you're running short on ingredients.
- Melted peanut butter (2 tbsp, for drizzling): A final flourish that ties everything together visually and reminds people what they're about to taste.
Tired of Takeout? 🥡
Get 10 meals you can make faster than delivery arrives. Seriously.
One email. No spam. Unsubscribe anytime.
Instructions
- Prepare your workspace:
- Preheat the oven to 350°F and line your 9x9-inch baking pan with parchment paper, leaving edges hanging over the sides. This overhang is your friend—it makes pulling out these bars later feel like a magic trick instead of a wrestling match.
- Build the crust:
- Mix the cookie crumbs, melted butter, and sugar until everything looks moistened and sandy, then press it firmly into the pan bottom. Bake for 8 minutes just to set it slightly, then let it cool while you move on to the filling—this prevents it from getting too dark underneath the cheesecake.
- Start the filling:
- Beat the softened cream cheese and sugar together until completely smooth and creamy, scraping the bowl sides frequently. This takes about 2 minutes and you'll know you're done when there are no visible lumps.
- Add the eggs carefully:
- Drop in one egg at a time, beating just until each one disappears into the mixture before adding the next. Overmixing at this stage introduces too much air and can cause cracks, so resist the urge to go wild with the mixer.
- Incorporate the flavor:
- Mix in the sour cream, peanut butter, and vanilla until everything is uniform and smooth, scraping down the sides as you go. The filling should look silky and rich.
- Add the texture:
- Fold in 1 cup of the chopped peanut butter cups gently, using a spatula instead of the mixer to avoid overworking the batter. You're folding, not stirring—think gentle and thoughtful.
- Pour and top:
- Spread the filling evenly over the cooled crust, then scatter the remaining 1/2 cup peanut butter cups across the top. They'll sink in a little and create pockets of chocolate and peanut throughout, which is exactly what you want.
- Bake with purpose:
- Bake for 25–28 minutes until the center jiggles just slightly when you shake the pan—it should look almost set but not completely firm. Overbaked cheesecake cracks, and nobody wants that, so trust your gut and that gentle jiggle.
- Cool with patience:
- Let the bars cool completely at room temperature for about an hour, then refrigerate for at least 2 hours until they're properly firm. The wait is worth it because cold cheesecake tastes infinitely better and slices cleaner.
- Finish like a pro:
- Before serving, drizzle with melted peanut butter and add chocolate chips if you're feeling fancy, then slice with a sharp knife (dipping it in hot water between cuts helps). Serve chilled and watch faces light up.
 Save
Save There's a particular joy in pulling these out of the fridge and slicing through that perfect layer of chocolate cookie crust into creamy cheesecake studded with actual candy pieces. It's the kind of dessert that makes people slow down and pay attention instead of just wolfing something down, and that moment of connection around these bars is what keeps me making them.
Why These Stand Out
Most cheesecake recipes feel intimidating because you're supposed to use a water bath and worry constantly about cracks. This version skips all that and instead relies on restraint—not overbeating, not overbaking, not overthinking—which somehow feels both simpler and more satisfying. The peanut butter and chocolate combination also takes cheesecake into comfort food territory instead of fancy restaurant territory, making these feel approachable even though they taste impressive.
Storage and Make-Ahead
These bars actually taste better the next day after the flavors have settled, so bake them the day before your party if you can manage it. They keep beautifully in an airtight container in the refrigerator for up to 5 days, though honestly they rarely last that long in real life because people keep sneaking into the kitchen.
Flavor Variations That Work
I've played around with these enough to know that this base is flexible without being fragile. You can add crunch by mixing roasted peanuts into the crust, or swap almond butter for peanut butter if that's your preference—just verify it's safe for anyone eating them. Pairing them with cold milk or a really good cup of coffee is the move, and that combination never gets old no matter how many times you make them.
- A handful of crushed pretzels mixed into the crust adds a salty-sweet surprise that people talk about.
- Swirling a bit of chocolate into the top before baking creates a marbled effect that looks fancy for zero extra effort.
- Leftover bars thaw just fine at room temperature if you accidentally forgot to move them to the fridge before leaving the house.
 Save
Save These bars transformed from a potluck discovery into something I make whenever I want to turn an ordinary moment into something people remember. There's real magic in that combination of creamy and crunchy, chocolate and peanut, and the fact that you can pull them together without stressing the entire afternoon.
Kitchen Tips & Answers
- → What type of crust is used for these bars?
A crunchy crust made from crushed chocolate cookies combined with melted butter and sugar serves as the base, baked briefly for firmness.
- → Can I substitute ingredients for allergies?
Almond butter can replace peanut butter for those with peanut allergies, but always check labels to avoid cross-contamination.
- → How should the bars be stored after preparation?
Store the bars in an airtight container in the refrigerator for up to five days to maintain freshness and texture.
- → What enhances the texture of the crust?
Adding finely chopped roasted peanuts to the crust mixture provides extra crunch and flavor.
- → Are there any topping options included?
The bars are topped with melted peanut butter drizzles and optional semisweet chocolate chips for added richness and decoration.