 Save
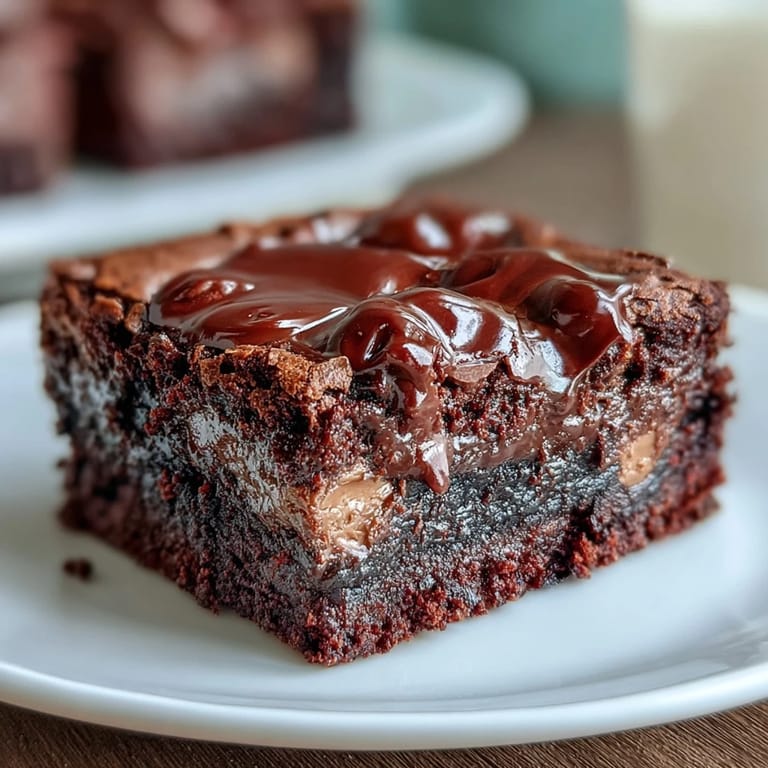
Save My sister texted me a photo of a half-eaten brownie at 11 PM, asking why I'd never made peanut butter cup brownies before. Turns out she'd discovered them at a bakery downtown and couldn't stop thinking about the way the candy melted into the fudgy layers. I laughed, decided to reverse-engineer them that weekend, and somehow created something even better than her original find. Now these brownies show up at every gathering, and people actually ask for them by name instead of just dessert.
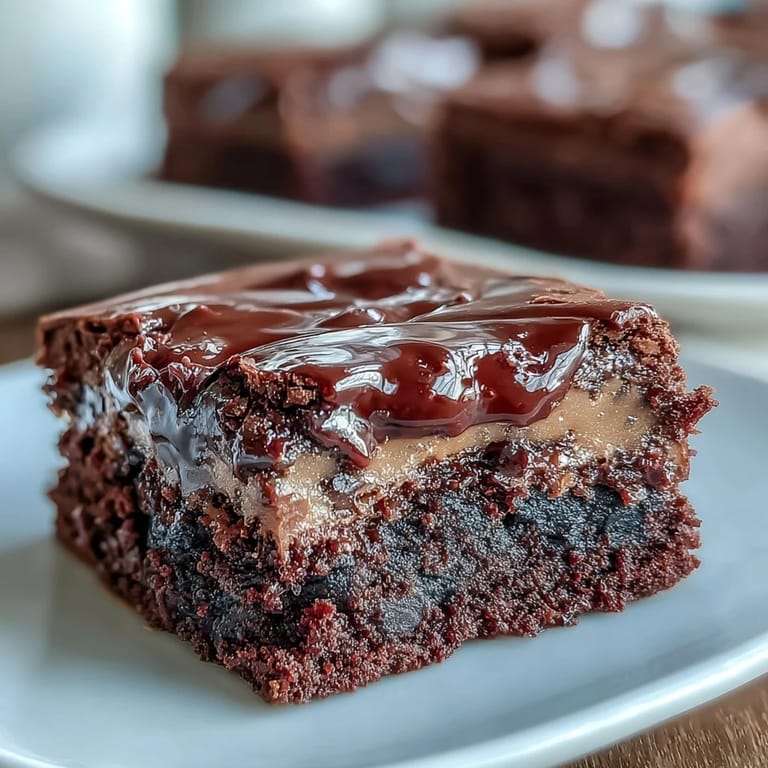
I made these for a book club meeting once, and the conversation literally stopped mid-sentence when someone took the first bite. One woman closed her eyes and said nothing for a full minute, which sounds dramatic but was somehow the best compliment I've ever received. She asked for the recipe that night, and I've since learned she makes them for her kids' teachers every December.
Ingredients
- All-purpose flour (1 cup): Keeps the brownies structured but tender when you fold it in gently, which honestly makes all the difference between dense and cakey.
- Unsweetened cocoa powder (1 cup): The backbone of that deep chocolate flavor, and using quality powder (not the sugared kind) is where people go wrong.
- Baking powder (1/2 teaspoon): Just enough lift to keep them fudgy without making them fluffy or cake-like.
- Salt (1/2 teaspoon): Don't skip this, it actually amplifies the chocolate and peanut butter flavors in a way that seems impossible until you taste it.
- Unsalted butter, melted (1 cup): The fat that makes everything rich and gives you that shiny top layer, so melt it fully and let it cool just slightly.
- Granulated sugar (2 cups): Creates that glossy batter base and contributes to the fudgy texture as it bakes.
- Large eggs (4): Each one adds moisture and binding power, so room temperature eggs mix in more smoothly than cold ones.
- Vanilla extract (2 teaspoons): A subtle backbone that lets the chocolate and peanut butter shine without competing.
- Semi-sweet chocolate chips (1 cup): Fold these in gently so they stay somewhat whole and create little pockets of melted chocolate throughout.
- Mini peanut butter cups (16 or 8 standard halved): The star of the show, and mini ones work better because they nestle into the layers without sinking or floating.
Tired of Takeout? 🥡
Get 10 meals you can make faster than delivery arrives. Seriously.
One email. No spam. Unsubscribe anytime.
Instructions
- Set yourself up for success:
- Preheat your oven to 350°F and line a 9x13-inch pan with parchment paper, leaving some overhang on the sides so you can lift the whole thing out later. This sounds fussy but saves you from scraping brownies off the pan with your fingernails at midnight.
- Dry ingredients go into one bowl:
- Whisk together the flour, cocoa powder, baking powder, and salt in a medium bowl, making sure the cocoa powder has no lumps hiding in there. A few whisks is all you need to get them evenly distributed.
- Create the glossy base:
- Pour your melted butter and sugar into a large bowl and whisk together until the mixture looks thick, shiny, and almost sanded. This creates the brownie structure, so don't skip the whisking.
- Add eggs slowly and deliberately:
- Crack in eggs one at a time, whisking well after each addition so they fully incorporate instead of creating weird streaks. Then stir in the vanilla extract until everything smells like chocolate heaven.
- Fold, don't mix:
- Pour the dry ingredients into the wet mixture and fold gently with a spatula until just barely combined, with a few flour streaks still visible. Overmixing toughens brownies, and we're going for fudgy here.
- Add the chocolate chips:
- Fold in the chocolate chips gently so they stay somewhat whole and create little pockets throughout instead of breaking up into a paste.
- Layer the first half:
- Spread exactly half the batter into your prepared pan, smoothing it out so it's relatively even across the surface.
- Position the peanut butter cups:
- Arrange your peanut butter cups in a scattered pattern on top of the batter layer, spacing them so you'll get one in most pieces when you slice. They'll sink slightly as you add the second layer, which is exactly what you want.
- Cover with the second half:
- Spoon the remaining batter over the peanut butter cups and smooth the top with a spatula, covering them almost completely. A little bit of candy showing through is fine and actually looks inviting.
- Bake until fudgy:
- Bake for 28 to 32 minutes, checking at the lower end by inserting a toothpick into the center. You want it to come out with a few moist crumbs still clinging to it, not completely clean and not swimming in batter.
- Cool completely in the pan:
- This is hard to wait for, but cooling them in the pan helps them set up without becoming cake-like. Once they're completely cool, lift them out using the parchment overhang and slice into 16 squares with a sharp knife.
 Save
Save My neighbor once brought these to a potluck and watched as people literally abandoned their salads mid-bite to grab a brownie. That moment taught me that sometimes the simplest pleasures, the ones that combine chocolate and peanut butter in the most straightforward way, are the ones people remember.
Why These Brownies Win Every Time
There's something almost silly about how well peanut butter and chocolate work together, like it's a flavor combination that needed no refinement. But building them into brownies instead of just serving them side-by-side creates this moment where all three elements, the fudgy chocolate, the melted candy, and the rich batter, become one thing entirely. It's why people get excited when they see these on a plate.
The Secret to Keeping Them Fudgy
The real trick is understanding that brownies keep cooking slightly after they come out of the oven, so pulling them out when they look just barely underdone gives you that perfect fudgy texture when they've cooled. I learned this the hard way by overbaking my first batch and getting something that tasted like cake, which isn't wrong, but it's not what we're after here.
Storage and Serving Ideas
These brownies actually improve after a day or two in an airtight container because the flavors meld and the texture becomes even more fudgy. You can serve them cold straight from the fridge, at room temperature, or even warmed slightly in the microwave with a scoop of vanilla ice cream, which is honestly the dream version.
- Store them in an airtight container at room temperature for up to four days, or wrap individually and freeze for up to two months.
- For extra indulgence, drizzle melted chocolate or peanut butter over the cooled brownies before storing.
- If you want to swap the peanut butter cups for something else, caramel candies or chocolate hazelnut spread work beautifully.
 Save
Save These brownies have quietly become the dessert that gets requested most often in my house, which tells you everything you need to know about how well this simple combination works. Make them for someone you like, or just for yourself on a Tuesday night when you need chocolate and comfort in the same bite.
Kitchen Tips & Answers
- → How do I ensure fudgy brownies?
Use melted butter and avoid overmixing the batter to keep the texture dense and moist.
- → Can I substitute peanut butter cups?
Caramel candies or chocolate hazelnut spread can be used for a different but delicious filling twist.
- → What pan size is recommended?
A 9x13-inch baking pan ensures even cooking and the right thickness for gooey layers.
- → How to tell when brownies are done?
Insert a toothpick in the center; it should come out with a few moist crumbs for perfect doneness.
- → Can these be served warm?
Yes, serving slightly warm with ice cream enhances the creamy, melty peanut butter layers.
- → What allergens are present?
Contains peanuts, eggs, milk, gluten, and soy from chocolate components—check individual product labels.