 Save
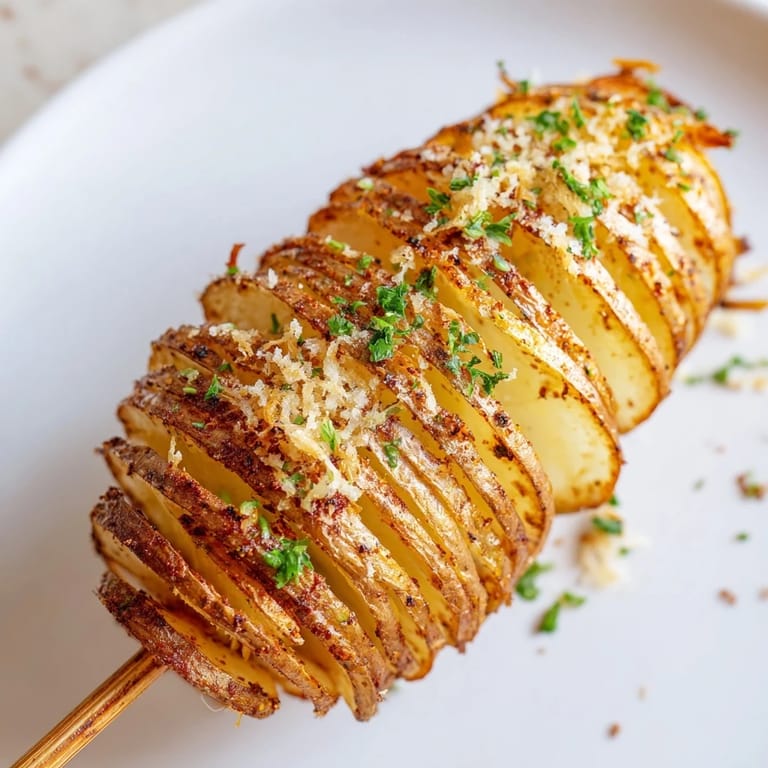
Save I discovered tornado potatoes by accident at a street fair, watching a vendor spiral-cut potatoes with the kind of casual confidence I'd never managed with a knife. The golden, crispy spirals came off the heat still steaming, and I grabbed one without thinking—it was impossibly crunchy on the outside, tender within, and seasoned just enough to make me reach for another immediately. Back home, I became obsessed with recreating that exact moment, and after a few slightly charred attempts and one skewer incident I'd rather forget, I finally nailed it. Now they're my go-to when I want something that looks showstopping but feels completely approachable to make.
My neighbor mentioned she'd never seen anyone make these before, so I invited her over on a Saturday afternoon to watch and share. Watching her face when she saw the spiral come together was worth every wobbly attempt that came before it—she grabbed one straight off the baking sheet, barely waited for it to cool, and ended up taking half a batch home. That's when I realized these weren't just a fun snack; they were the kind of thing that makes someone feel included in something a little bit special.
Ingredients
- Russet potatoes (4 medium): These have the right starch content and structural integrity to hold the spiral without falling apart, and their neutral flavor lets your seasonings shine.
- Olive oil (3 tablespoons): It's what carries all those seasonings and creates that crispy exterior you're chasing.
- Garlic powder, smoked paprika, onion powder (1 teaspoon each): Together they create a savory base that tastes like they've been layered with intention.
- Chili powder (½ teaspoon, optional): A small amount adds warmth without overwhelming, though you can skip it if you prefer pure comfort over complexity.
- Salt and black pepper (1 teaspoon and ½ teaspoon): These are non-negotiable—they wake up every other flavor and make the potato taste more like itself.
- Lemon juice (1 tablespoon, optional): If you're spiralizing ahead of time, this prevents that grayish browning that happens when potatoes sit around.
- Parmesan and parsley (2 tablespoons each): The finish that transforms these from good to memorable, though they're truly wonderful without any garnish at all.
Tired of Takeout? 🥡
Get 10 meals you can make faster than delivery arrives. Seriously.
One email. No spam. Unsubscribe anytime.
Instructions
- Set your stage:
- Preheat your oven to 400°F and line a baking sheet with parchment paper or foil—this matters because it prevents sticking and makes cleanup feel like a gift to your future self. While it heats, wash your potatoes under cold water, scrubbing any dirt away, and leave the skins on because that's where the crispiness lives.
- Skewer and spiral:
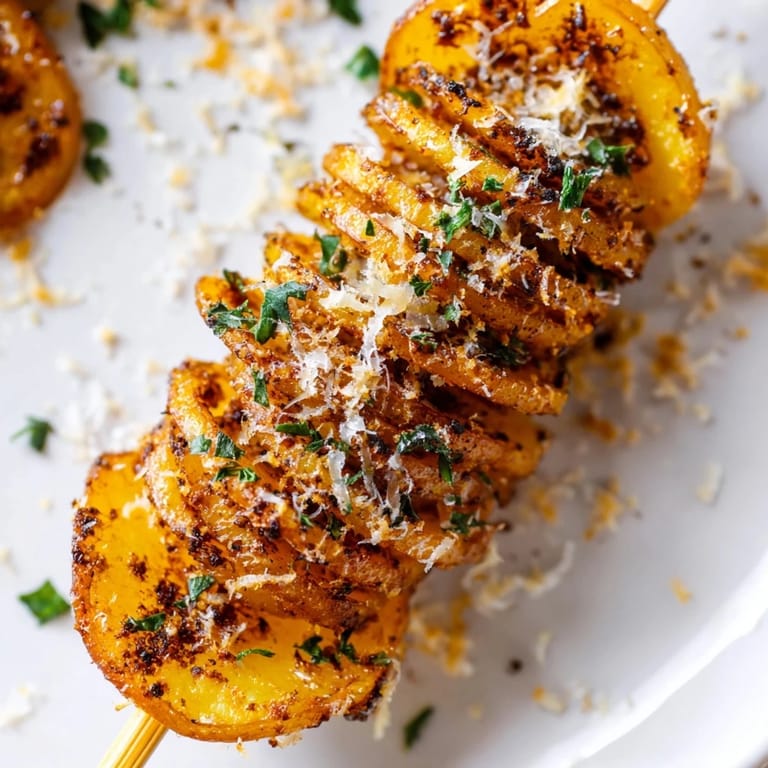
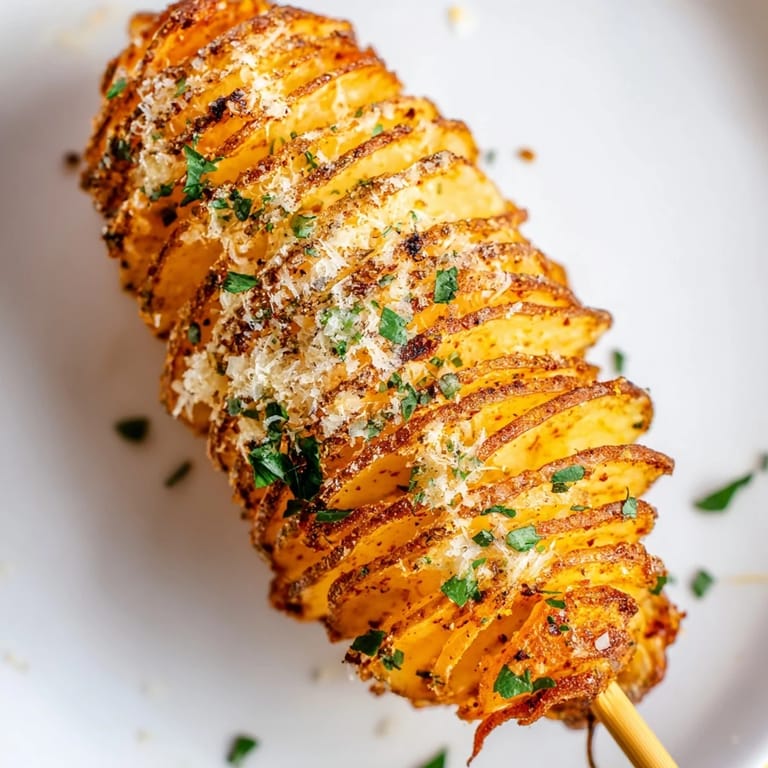
- Push a wooden skewer lengthwise through the center of each potato until it's firmly seated. Using a sharp knife, start at one end and cut in a spiral motion while rotating the potato, working your way down until you've created one continuous spiral—then gently stretch it out along the skewer, spacing the loops evenly.
- Optional browning prevention:
- If you're not cooking them immediately, dip the spiralized potatoes in a bowl of cold water mixed with lemon juice for about 5 minutes, then drain and pat them completely dry on paper towels. This step only matters if you're working ahead; if you're cooking right away, skip it.
- Season with confidence:
- In a small bowl, whisk together olive oil, garlic powder, smoked paprika, onion powder, chili powder, salt, and pepper until it looks like a fragrant paste. Using a pastry brush, coat every inch of the spiralized potato, making sure the oil gets into the grooves where the real flavor happens.
- Position for perfection:
- Arrange your skewered potatoes on the baking sheet so they're elevated and not touching the surface—rest the skewer ends on the rim of the pan if you can, or use a wire rack underneath. This airflow is what transforms them from steamed potato into crispy perfection.
- Roast and rotate:
- Slide the pan into your preheated oven and roast for 25 to 30 minutes, turning each skewer halfway through so both sides get equally golden. You'll know they're done when the edges are deeply browned and you can hear them crackle slightly when you move the pan.
- Finish strong:
- Remove from the oven and immediately sprinkle with grated Parmesan and fresh parsley if you're using them. Serve while they're still hot and the contrast between crispy exterior and tender interior is most dramatic.
 Save
Save There's a moment about halfway through cooking when you open the oven and the smell hits you—garlicky and warm and somehow making your kitchen feel like a gathering place rather than just a kitchen. That aroma, combined with watching people's reactions when they realize these came from your hands and a knife, is when these stop being a recipe and become a small act of cooking with joy.
Seasoning Variations That Work
The beauty of this recipe is how adaptable it is once you understand the base. I've made versions with Italian herbs (oregano and thyme), a Cajun blend (adding cayenne and a touch of paprika), and even a curry powder version that surprised everyone by how well it worked. The key is keeping your total seasoning amount roughly the same so you don't oversalt or underwhelm—think of it as swapping out flavor profiles while keeping the structure intact.
Air Fryer and Broiler Options
If you have an air fryer, these actually cook faster and sometimes even crispier than the oven—try 375°F for 18 to 20 minutes, shaking the basket halfway through. For broiler finishing, roast as directed and then slide the pan under a hot broiler for just 2 minutes to deepen the color and amplify the crispiness; watch closely because the difference between golden and burned happens in seconds.
Serving and Storage Wisdom
These are best served immediately while the contrast between crispy outside and creamy inside is most pronounced, but they're also forgiving enough to reheat in a 350°F oven for about 10 minutes if your timing doesn't align with eating. They pair beautifully with sour cream, tangy aioli, ketchup, or even a simple garlic mayo—let people dip according to their mood.
- Store cooled leftovers in an airtight container in the refrigerator for up to three days, and refresh them in a hot oven rather than the microwave to restore their crispiness.
- If you want to make these ahead, you can spiralize and refrigerate the potatoes for a few hours, but brush them with oil only just before roasting so they stay dry.
- These don't freeze particularly well because reheating disrupts the texture, so it's better to make them fresh or in smaller batches that your group will actually finish.
 Save
Save These tornado potatoes have become my answer to the question of what to bring or make when I want something that feels thoughtful without demanding hours in the kitchen. They're a reminder that sometimes the most memorable food is the kind that catches someone by surprise.
Kitchen Tips & Answers
- → How do you create the spiral shape on the potatoes?
Insert a wooden skewer through the length of the potato and carefully slice in a continuous spiral while rotating it, then stretch out the cut along the skewer.
- → What seasonings enhance the flavor of tornado potatoes?
A mix of garlic powder, smoked paprika, onion powder, chili powder, salt, and pepper offers a smoky, savory profile that complements the potatoes well.
- → Can these spiral potatoes be made extra crispy?
Yes, baking at a high temperature and optionally finishing under the broiler for two minutes helps achieve extra crispiness.
- → Is it necessary to peel the potatoes before cooking?
No, keeping the skins on adds texture and enhances crispiness during roasting.
- → What are some alternative cooking methods for tornado potatoes?
They can also be cooked in an air fryer at 375°F for 18–20 minutes to get a crispy finish.
- → How can I prevent the potato spirals from browning before cooking?
Soaking the spiralized potatoes in water mixed with lemon juice for a few minutes helps prevent discoloration.