 Save
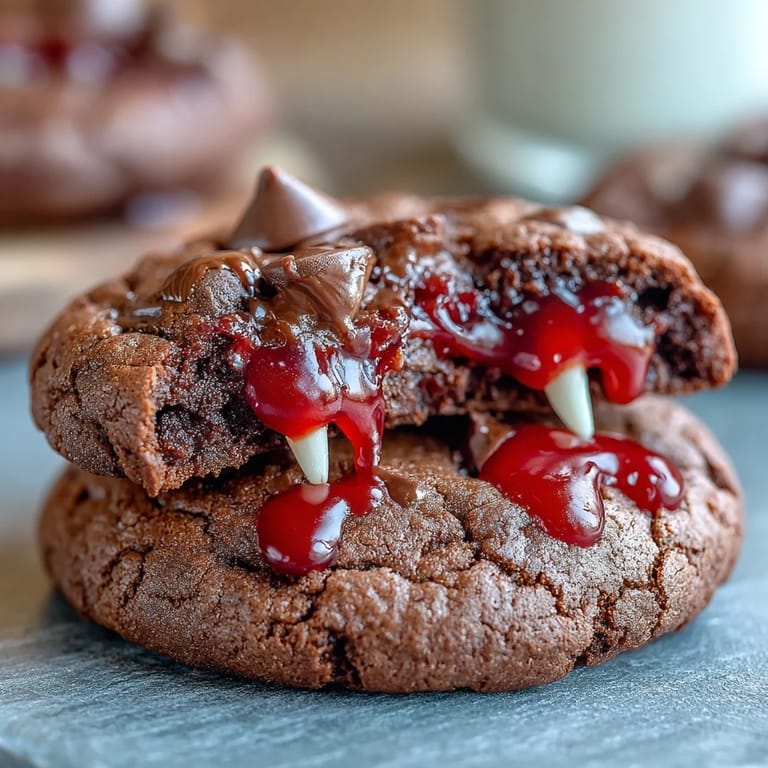
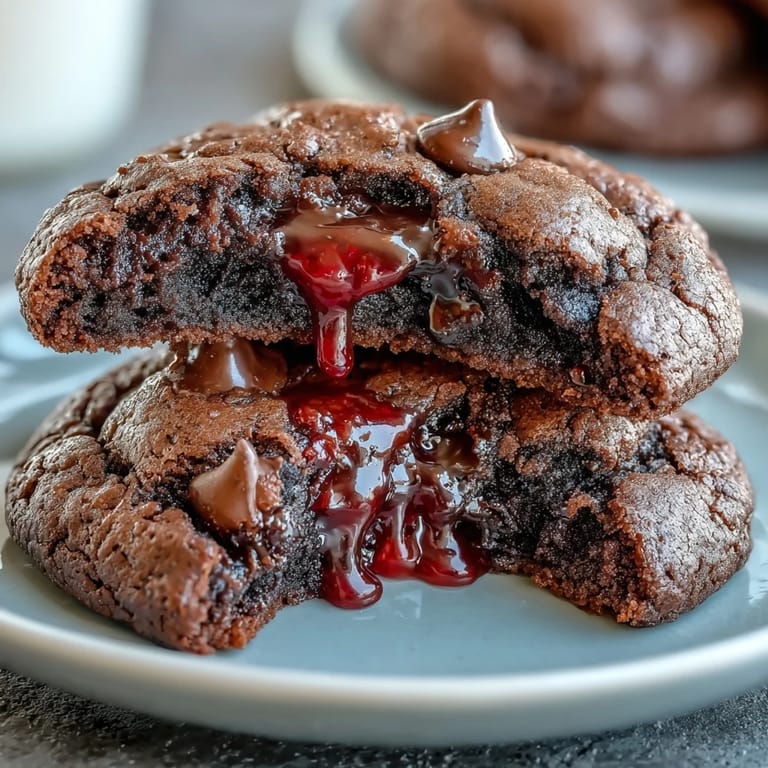
Save My nephew burst through the kitchen door mid-October with a catalog of Halloween costume ideas, and somehow we landed on the idea of making cookies that matched his vampire theme. I'd never attempted anything quite so theatrical with baking before, but there was something irresistible about the challenge of turning a simple chocolate cookie into a miniature character. That afternoon, our kitchen smelled like cocoa and mischief, and by the time the first batch emerged from the oven, I understood why he was already plotting how many he could sneak before the trick-or-treating began.
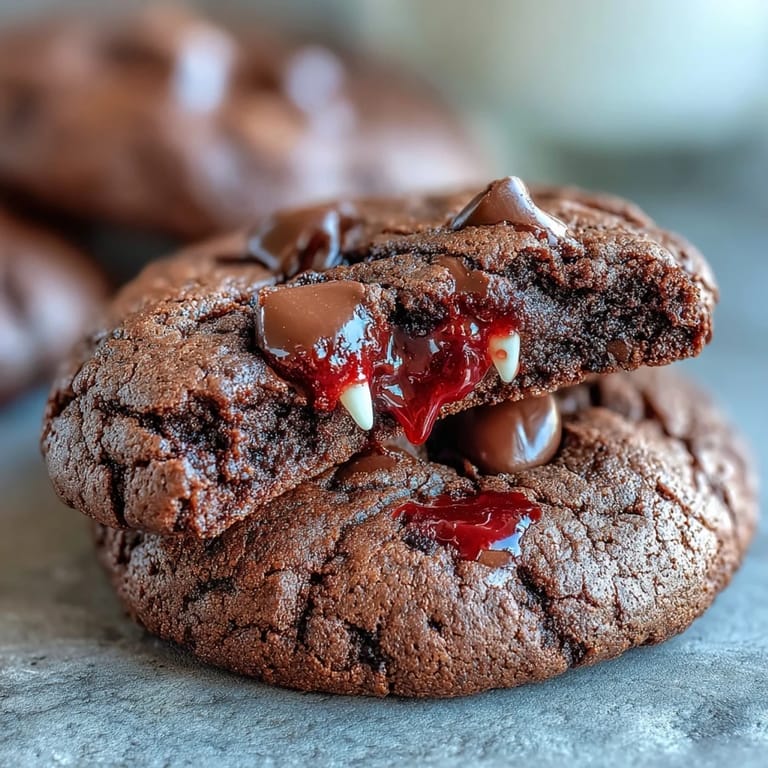
I'll never forget watching my nephew carefully position the candy fangs into a warm cookie, his tongue poking out in concentration as he tried to get them just right. When he finally piped the red gel icing in a dramatic drip, he looked up like he'd just performed surgery, and honestly, the pride on his face made the whole project worth it. That batch became the highlight of his Halloween party, and I've made them every year since because they're one of those rare things that bridges baking and play.
Ingredients
- All-purpose flour (2 cups): The foundation that gives structure, though I always aerate mine by whisking instead of scooping straight from the bag to avoid packing it down too much.
- Unsweetened cocoa powder (¾ cup): This is where the deep chocolate flavor lives, so resist the urge to use the sweetened hot cocoa mix no matter how convenient it seems.
- Baking soda (1 tsp): Your leavening agent that helps the cookies spread and rise slightly, creating those soft centers we're after.
- Salt (½ tsp): A pinch that amplifies the chocolate and balances the sweetness in ways you won't consciously notice but definitely will miss if it's omitted.
- Unsalted butter (1 cup), softened: Room temperature is non-negotiable here because cold butter won't cream properly and you'll end up with dense cookies instead of tender ones.
- Granulated sugar (1 cup): The main sweetener that creams with butter to incorporate tiny air pockets, which becomes the secret to that fudgy texture.
- Light brown sugar (½ cup, packed): Brown sugar adds moisture and molasses depth that keeps these cookies chewy even after a day or two.
- Large eggs (2): Room temperature eggs emulsify better with the butter and add structure, so pull them out of the fridge 30 minutes before you start.
- Pure vanilla extract (2 tsp): The real thing makes a difference in cookies because there's nothing else to mask inferior flavor, so invest in the good bottle.
- Semisweet chocolate chips (1 cup): Fold these in gently to avoid overmixing the dough, which would toughen your cookies and ruin that tender crumb.
- Candy fangs or white jelly beans (48): The theatrical element that transforms ordinary cookies into characters; if you can't find specialty fangs, white jelly beans work surprisingly well.
- Red gel icing (¼ cup): Gel icing sets faster than liquid food coloring mixed with icing, so your blood drips stay put instead of running everywhere.
Tired of Takeout? 🥡
Get 10 meals you can make faster than delivery arrives. Seriously.
One email. No spam. Unsubscribe anytime.
Instructions
- Set the stage:
- Preheat your oven to 350°F and line two baking sheets with parchment paper, because nothing ruins the moment quite like cookies sticking to a bare pan. This takes two minutes and saves the entire batch from disaster.
- Build the dry foundation:
- Whisk together flour, cocoa powder, baking soda, and salt in a medium bowl, making sure the cocoa powder breaks up into the flour evenly. I like to whisk this mixture for about 30 seconds longer than I think necessary, just to ensure no cocoa clumps surprise me later.
- Cream butter and sugars:
- In a large bowl, beat softened butter with both sugars until the mixture looks pale, fluffy, and lighter in color than when you started, which takes about 2 to 3 minutes. This step is where the magic happens because you're incorporating air that will make these cookies tender instead of brick-like.
- Introduce the eggs:
- Beat in one egg at a time, fully incorporating each before adding the next, then mix in the vanilla extract until everything is smooth. If you rush this step, the dough won't emulsify properly and you'll end up with a grainy texture instead of silky.
- Marry wet and dry:
- Gradually add the dry ingredients to the wet mixture, stirring just until combined and no flour streaks remain visible. Resist the urge to overbeat here because developing too much gluten will result in tough, cake-like cookies instead of the chewy indulgence you're after.
- Fold in the chocolate:
- Gently fold in the semisweet chocolate chips using a spatula with minimal stirring to avoid overworking the dough.
- Portion and space:
- Scoop tablespoon-sized portions of dough onto your prepared baking sheets, leaving about 2 inches between each one because these cookies want room to spread. I use a small ice cream scoop for consistency, which makes the whole process faster and more professional looking.
- Bake to fudgy perfection:
- Bake for 9 to 11 minutes, watching for the moment when the edges are set but the centers still jiggle slightly when you shake the pan. This is where experience matters because ovens vary, so start checking at 9 minutes and look for that specific tell rather than relying on time alone.
- Cool and transition:
- Remove from the oven and let cookies sit on the baking sheet for 5 minutes while they continue cooking gently from residual heat, then transfer to a wire rack. This resting period is crucial because it allows the centers to firm up slightly without hardening the entire cookie.
- Fang placement:
- While the cookies are still warm and slightly pliable, gently press two candy fangs into each cookie to resemble vampire teeth, positioning them near the top. Work quickly because once they cool completely, the cookies harden and the fangs won't press in as easily.
- Add the blood:
- Use red gel icing to pipe dramatic blood drips around the fangs, creating theatrical effect that makes even adults smile. Let the icing set completely before stacking or storing to prevent smudging.
 Save
Save There's something unexpectedly special about how these cookies bridge the gap between serious baking and pure play. My sister now requests them every Halloween, not because they're complicated or require rare ingredients, but because they remind everyone that dessert should make you smile before you even taste it.
Temperature and Timing Matter More Than You Think
Cold butter won't cream properly, which means your dough won't have that light, airy quality that makes these cookies special instead of dense. Room temperature eggs emulsify better and help bind everything together seamlessly, so pull them from the fridge about 30 minutes before you start baking. The oven temperature is equally important because just 25 degrees off can mean the difference between perfectly chewy centers and disappointingly firm cookies throughout.
The Secret to Keeping Them Fresh
These cookies peak in texture on day one when the centers are still slightly fudgy, but they hold up beautifully in an airtight container for up to 4 days. I've found that layering them between parchment paper prevents them from sticking together while still allowing them to soften slightly as they sit. If they ever feel too firm, placing a slice of bread in the container overnight will gently soften them without making them stale.
Make Them Your Own
The beauty of this recipe is how it welcomes personalization and experimentation. Try adding a pinch of cinnamon or espresso powder to deepen the chocolate flavor, or swap in white chocolate chips for part of the semisweet for a different flavor dimension. If you can't find specialty candy fangs, white jelly beans work surprisingly well, or even slivered almonds create an interesting texture contrast when pressed into still-warm cookies.
- A tiny pinch of cayenne pepper adds subtle heat that amplifies the chocolate without tasting spicy.
- Pressed fangs stick better to warm cookies, so work quickly before the batch cools completely.
- Red gel icing sets faster than liquid food coloring, keeping your theatrical blood drips exactly where you want them.
 Save
Save These cookies have become my go-to when I want to bake something that tastes indulgent but feels like celebration. Whether you're making them for Halloween or just because someone needs a reminder that dessert should be fun, they deliver on both fronts.
Kitchen Tips & Answers
- → What makes these cookies chewy?
The combination of brown sugar and granulated sugar, along with properly creamed butter and eggs, creates a moist, chewy texture inside these chocolate cookies.
- → Can candy fangs be substituted?
Yes, white jelly beans or slivered almonds can be used as alternatives to candy fangs for a similar playful effect.
- → How is the red gel icing used?
Red gel icing is piped around the candy fangs after baking to create a dramatic 'blood' effect enhancing the spooky appearance.
- → How long should the cookies bake?
Bake the cookies for 9 to 11 minutes at 350°F (175°C) until the edges are set but the centers remain soft for optimal texture.
- → Can these be made ahead of time?
Yes, cookies store well in an airtight container for up to 4 days, though icing and fangs are best added fresh before serving.