 Save
Save I'll never forget the December afternoon when my grandmother pulled a gingerbread house frame from her oven, the kitchen filling with the warm aroma of molasses, cinnamon, and ginger. She arranged it on her best holiday platter, surrounded by homemade cookies and chocolates, and suddenly our entire table transformed into something magical. That day, I learned that this isn't just a dessert—it's edible architecture, a centerpiece that holds memories and becomes the heart of every holiday gathering that follows.
I remember my daughter's eyes lighting up when she realized the gingerbread walls were actually edible—she reached for a corner piece mid-dinner, and suddenly everyone at the table was doing the same, breaking off little pieces while sharing stories. What started as decoration became our dessert, and what could have been messy turned into one of those perfect chaotic moments that make holidays unforgettable.
Ingredients
- All-purpose flour (300g): The foundation of your house—it holds everything together and gives you that tender bite. Brown sugar (100g) adds warmth and depth that regular sugar never could
- Unsalted butter (100g), softened: Creaming this properly with the sugar is your first secret; it aerates the dough and makes the baked panels tender enough to handle but sturdy enough to build with
- Molasses or dark honey (100g): This is where the soul of gingerbread lives—that deep, almost smoky sweetness that tastes like tradition itself
- Large egg (1): Binds everything and adds richness; make sure it's at room temperature so it incorporates smoothly
- Ground ginger (1 tsp): The star player—it gives you that gentle heat and brightness that makes people say 'I taste something special'
- Ground cinnamon (1 tsp): Adds complexity and warmth without overpowering; this is what people smell first
- Ground cloves (½ tsp): Just enough to whisper in the background—this tiny amount changes everything
- Baking soda (½ tsp): Creates lift and helps the panels bake evenly; don't skip this
- Salt (¼ tsp): Brings every spice into focus
- Egg white (1): Your adhesive—this becomes the royal icing that holds your house together, so don't substitute
- Powdered sugar (200g), sifted: Sift it before measuring; lumps will show up as grittiness in your icing
- Lemon juice (½ tsp): Cuts the sweetness of the icing and makes it taste less one-dimensional
- White chocolate (50g), melted: For decoration and drizzling—it softens the brown tones and catches the light beautifully
- Assorted candies: Chocolate buttons, white sprinkles, mini marshmallows—these are your personality on the house
Tired of Takeout? 🥡
Get 10 meals you can make faster than delivery arrives. Seriously.
One email. No spam. Unsubscribe anytime.
Instructions
- Cream butter and brown sugar:
- In a large bowl, cream the softened butter with brown sugar until it's light, fluffy, and pale—this takes about 3 to 4 minutes with an electric mixer. You're incorporating air into every corner of the mixture, which will make your baked panels more delicate. Take a moment and really feel how the texture changes under the beaters.
- Add the wet ingredients:
- Beat in the egg until it disappears completely into the mixture, then add your molasses slowly. The mixture might look curdled—don't panic. This is normal. Keep mixing until it comes together into something glossy and unified.
- Combine the spiced flour:
- In a separate bowl, whisk together flour, ginger, cinnamon, cloves, baking soda, and salt. This whisking is important; it distributes the spices evenly so every bite tastes the same. Smell this mixture—this is the heart of gingerbread.
- Bring it together:
- Gradually add your dry mixture to the wet ingredients, stirring until a smooth dough forms. This shouldn't be sticky; if it is, add a tablespoon more flour. Wrap the dough in plastic wrap and let it rest in the refrigerator for at least 30 minutes. This rest makes the dough easier to roll and helps it hold its shape while baking.
- Prepare your workspace:
- Preheat your oven to 180°C (350°F). Line a baking sheet with parchment paper—this is non-negotiable for even baking and easy release.
- Roll and cut:
- On a lightly floured surface, roll your dough to about 5mm thickness—imagine a pencil lying on top as your guide. Using templates or a sharp knife, cut out your house panels: front, back, two sides, and roof pieces, each about 10 to 12 cm. A tip I learned the hard way: chill your cut pieces for 10 minutes before baking so they hold their shape.
- Bake until just set:
- Place panels on your prepared baking sheet. Bake for 10 to 12 minutes until the edges are just firm but the centers still feel tender—don't overbake. You want them crisp enough to handle but not so dry they shatter. Cool completely on a wire rack before touching them.
- Make your icing glue:
- Beat an egg white to soft peaks—this takes about 2 minutes. Gradually add sifted powdered sugar and lemon juice, beating constantly. You're looking for an icing that's thick and glossy, thick enough to hold panels in place but soft enough to pipe. This is your structural element, so take your time with it.
- Assemble your house:
- This is the moment where patience becomes your best ingredient. Pipe a generous line of royal icing along the edges of each panel, then press them together. Hold each joint for a few seconds until the icing starts to grip. Build slowly—attach the sides first, then the roof pieces. Let the entire structure set for at least 30 minutes. Rushing this step is how houses lean.
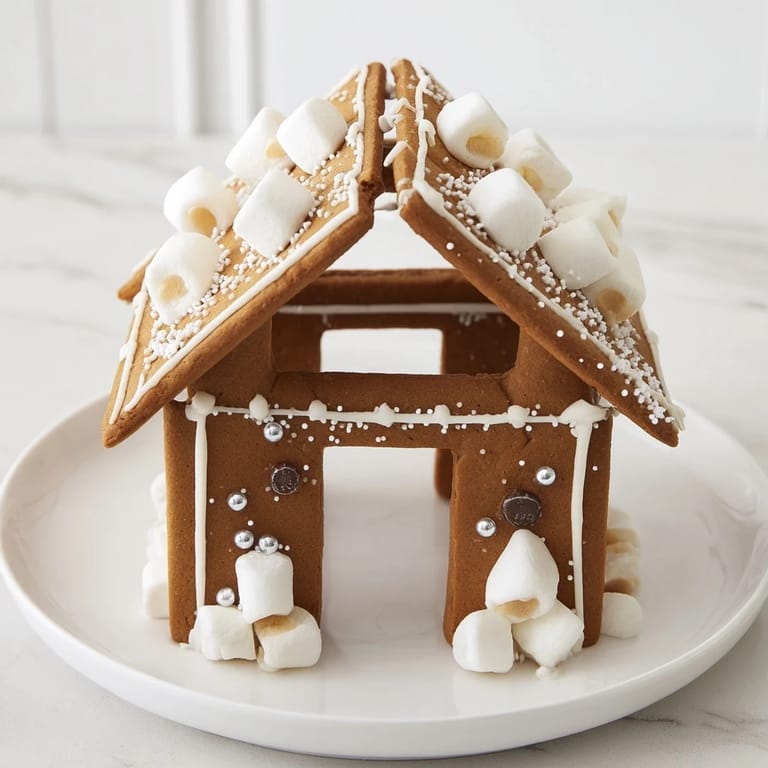
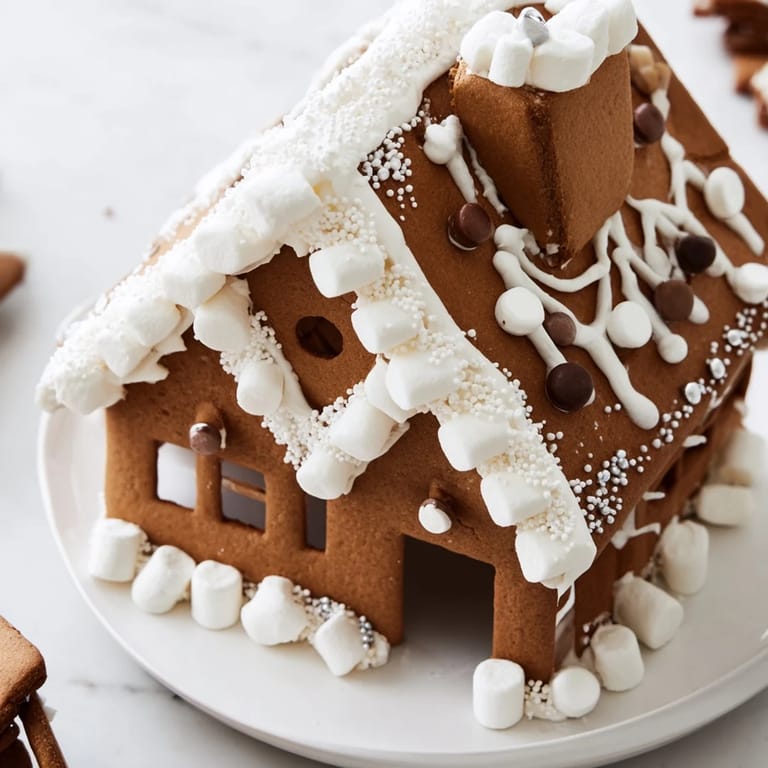
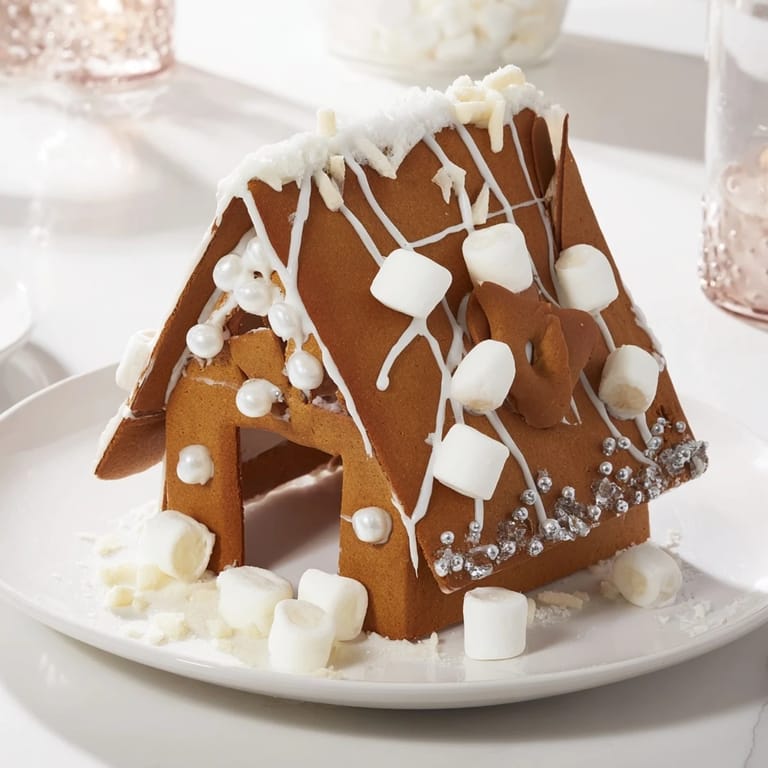
- Decorate with joy:
- Once your frame is sturdy, pipe white chocolate drizzles along the seams and edges, then press candies, sprinkles, and marshmallows into place with more royal icing. This is where the house becomes yours—there's no right way, only what makes you happy. If you want, dust everything with edible glitter for a snowy effect.
- Complete your platter:
- Once the house is fully set, place it on your best platter. Arrange additional cookies, nuts, dried fruit, or holiday treats around it, filling the negative space. The house frame becomes a border, and everything inside becomes part of the story.
 Save
Save My favorite memory isn't from the moment the house was perfect—it's from when my son broke off the corner of the front wall reaching for a cookie, and instead of frustration, we all laughed. He patched it with icing and a marshmallow, and that crooked repair became the most genuine, lived-in detail of the whole creation. Sometimes the most beautiful things are the ones that tell the story of being loved and used.
Make It Ahead and Store Smartly
You don't have to bake and assemble the house the same day—in fact, baking the panels a day or two ahead makes assembly much easier. Once the panels are cool, store them in an airtight container with parchment between layers. They'll stay crisp for up to a week. Then, on the day you want to assemble, your panels are ready and stable. I like to make the icing fresh on assembly day because it sets faster and stronger when it's just been beaten. This advance-prep approach means the actual assembly becomes a calm, meditative activity rather than a frantic race against time.
Playing With Flavor and Color
The beauty of gingerbread is how forgiving it is to your personal taste. If you love deeper, darker molasses notes, add a tablespoon of cocoa powder to the dough—it won't overpower the spices, just deepen them. If the cloves feel too strong for your family, reduce them to ¼ teaspoon. I've also replaced the molasses with dark honey for a softer spice profile, and the house still bakes beautifully. The decoration is entirely yours—swap the white chocolate for dark chocolate drizzles, use crushed candy canes instead of sprinkles, or pile on dried cranberries for pops of color. Some years I go minimalist with just icing and marshmallows; other years I go full carnival with every candy in the house.
Serving Suggestions and Pairings
A gingerbread house frame isn't just beautiful—it's meant to be eaten. As you serve dinner or dessert, encourage guests to break off pieces of the house itself alongside the treats arranged inside. The warm spices pair wonderfully with hot chocolate, mulled wine, spiced cider, or even strong black tea. I've found that the gingerbread's richness actually balances perfectly with a crisp white wine if you're feeling festive. Some traditions call for leaving the house on the table throughout the meal so people can nibble as the spirit moves them. Others use it as a final dessert presentation, dramatic and whole. Either way, it becomes the focal point of the gathering—less about the eating and more about the memory of something beautiful you made together.
- Break off pieces as you serve, making the house part of the dessert experience rather than just decoration
- If any candies loosen during the meal, just tighten them back with a dab of icing—the house can be refreshed mid-celebration
- The house stays fresh and crisp for about 3 days after assembly, perfect for a multi-day holiday celebration
 Save
Save This gingerbread house frame is more than a recipe—it's permission to build something beautiful with your hands and share it with the people who matter most. Every crack, every crooked wall, every candy placed with intention becomes part of the story you're telling.
Kitchen Tips & Answers
- → How long should the dough chill before baking?
Wrap the dough in plastic and chill for at least 30 minutes to firm up for easier handling.
- → What spices give the gingerbread its classic flavor?
Ground ginger, cinnamon, and cloves blend to create the warm, aromatic profile of this gingerbread.
- → Can the royal icing be substituted?
Yes, a vegan alternative can be used if egg white is not desired for assembling and decorating.
- → Is it possible to prepare the panels ahead of time?
For extra sturdiness, bake the panels a day ahead and store them airtight before assembly.
- → What decorations work best with this frame?
White chocolate drizzles, assorted candies, sprinkles, and edible glitter enhance the festive appearance.
- → What tools are recommended for assembly?
Using a piping bag for royal icing and a rolling pin for dough thickness ensures precise shaping and strong bonds.