 Save
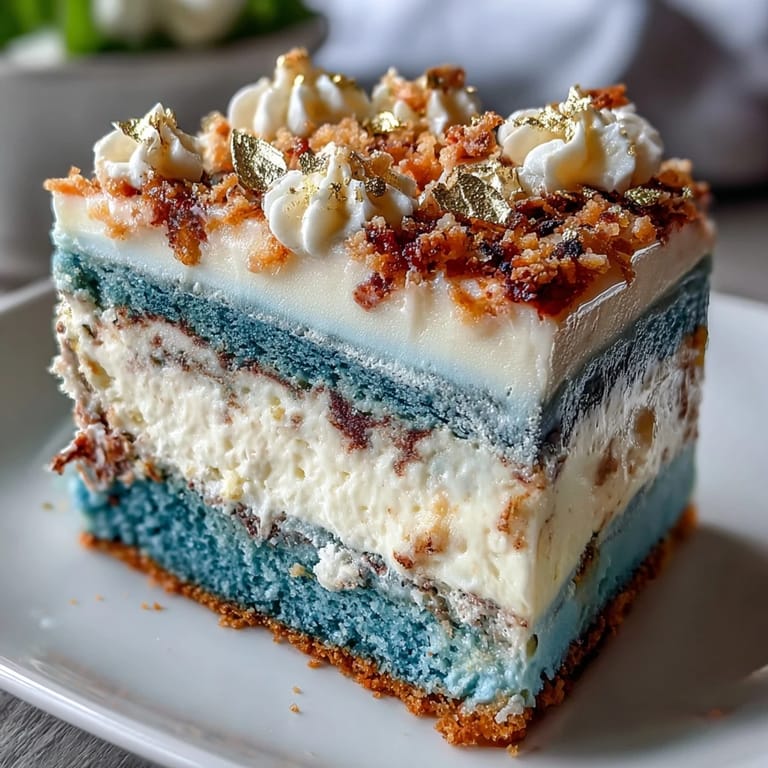
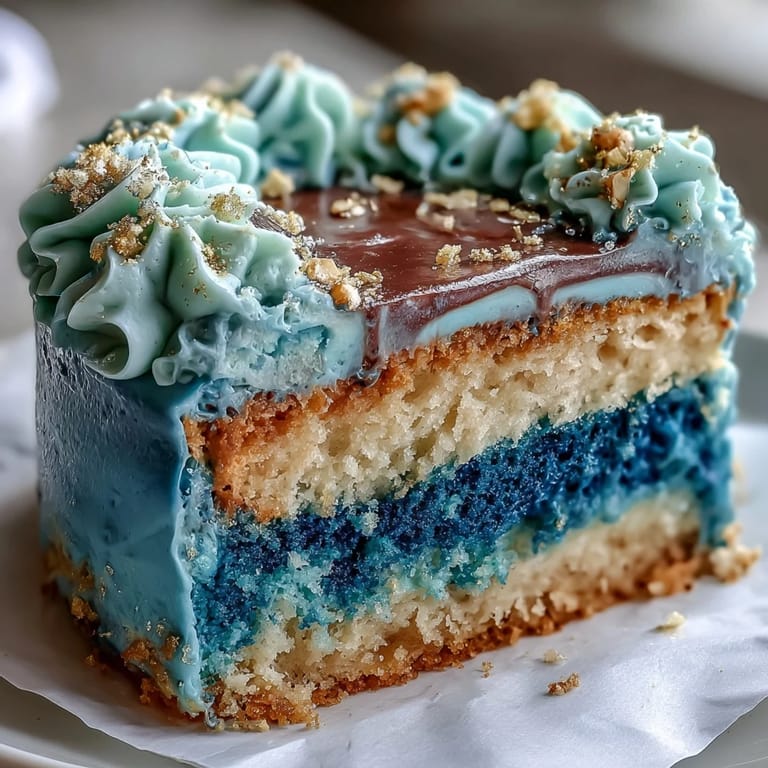
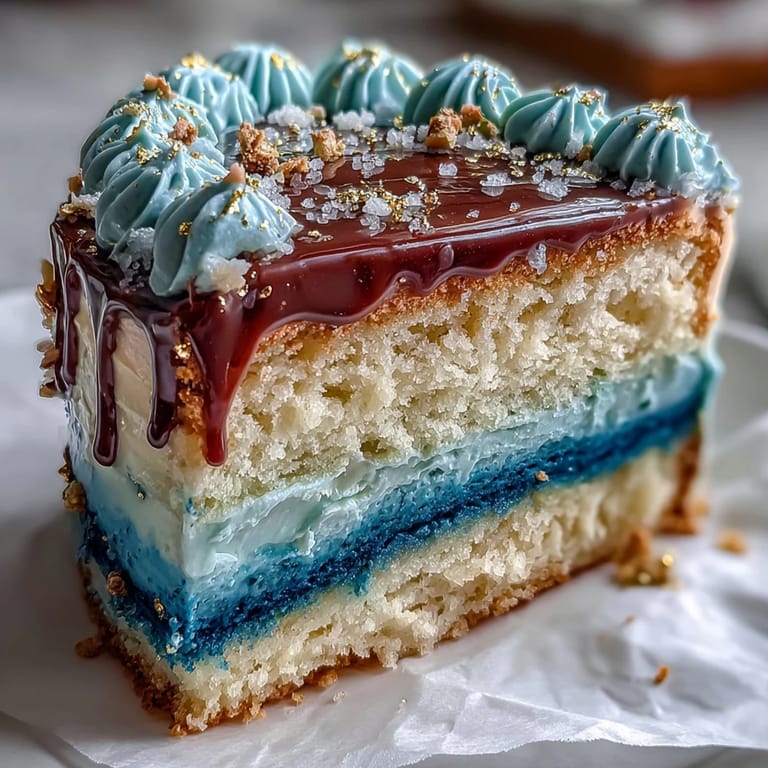
Save The first time I made this graduation cake, the kitchen was filled with the sweet, buttery aroma of vanilla mingled with a nervous energy that I couldn't ignore. My spatula skill nearly failed me as I swirled blue gel food coloring into the batter—the palette grew more vivid with every layer. The whole process felt like painting, only tastier. There was a satisfaction in watching the ombre blues emerge, each shade a badge of celebration. It's the sort of cake that inspires you to craft something memorable, even if you're prone to smudging frosting.
I remember piping the final gold streak while the boys hovered nearby, eagerly claiming their favorite shade of blue. Laughter bounced off the walls when someone asked if I'd run out of gold leaf or patience. As we sliced into the cake, the layers were revealed like surprise presents—and the room erupted in a round of applause. It was graduation afternoon, and even the kitchen collected a sense of accomplishment. There's something exceptional about a cake that marks the moment and the memory.
Ingredients
- All-purpose flour: Reliable for a sturdy yet soft crumb; I always sift it to prevent lumps in the batter.
- Baking powder: Helps the layers rise evenly; fresh baking powder makes a noticeable difference.
- Baking soda: Gives a tiny boost for extra tenderness in the crumb.
- Salt: Enhances the sweetness and balances each blue layer beautifully.
- Unsalted butter: Room temperature is key for a creamy blend; softer butter makes smoother batter.
- Granulated sugar: For structure and a classic vanilla sweetness, beat it until fluffy with the butter.
- Eggs: Bind and enrich; I crack them into a separate bowl to avoid shells spoiling the symmetry.
- Pure vanilla extract: Adds fragrant warmth; don't skimp for authentic flavor.
- Whole milk: Room temperature helps batter blend smoothly and prevents curdling.
- Blue gel food coloring: Gel delivers bold, clean ombre shades without thinning the batter.
- Powdered sugar: Sifted before mixing to guarantee a smooth, lump-free buttercream.
- Milk or cream: Adjusts the consistency; drizzle slowly for perfect spreadability.
- Edible gold leaf or gold dust: Adds that luxe finish; I touch these up with a clean brush for drama.
- Clear alcohol (vodka or lemon extract): Use with gold dust; a light hand keeps the brush strokes delicate.
Tired of Takeout? 🥡
Get 10 meals you can make faster than delivery arrives. Seriously.
One email. No spam. Unsubscribe anytime.
Instructions
- Prepare Pans and Oven:
- Grease and line three 8-inch cake pans with parchment, then set your oven to 350°F. This is one of those moments where neatness pays off, so smooth out the liners for easy release.
- Mix Dry Ingredients:
- Whisk flour, baking powder, baking soda, and salt until combined—the airy blend will help ensure even, fluffy layers later on.
- Beat Butter and Sugar:
- Cream butter and sugar together in a large bowl until pale and airy. Listen for the mixer's change in pitch—that's when you know it's ready.
- Add Eggs and Vanilla:
- Stir eggs in one by one, beating after each, then pour in vanilla; keep the bowl steady, as the mixture transforms into a luscious base.
- Alternate Flour and Milk:
- Add dry ingredients and milk in three parts, starting and finishing with flour. Gently mix to keep the batter light and avoid overworking it.
- Color and Divide Batter:
- Portion the batter into three bowls and blend in varying blue gel colors—from light to deep navy. Try not to overmix as you admire each gradient.
- Bake Layers:
- Pour each colored batter into a pan, smoothing the tops with an offset spatula. Bake for 25–30 minutes, until a toothpick draws out clean and the layers bounce when pressed.
- Cool the Cakes:
- Let the cakes rest in their pans for 10 minutes, then transfer them to wire racks to cool completely. If you rush, the buttercream will melt—patience here is your friend.
- Make Buttercream:
- Beat room temperature butter until creamy, then add powdered sugar gradually. Finish with vanilla, salt, and milk until the texture is perfectly spreadable.
- Tint Buttercream:
- Reserve about a cup for the crumb coat, then tint the rest dark blue. The color deepens as it sits, so mix steadily.
- Level and Layer Cakes:
- Trim domes from cooled cakes for neat stacking. Place the darkest blue layer first, cover with buttercream, then follow with lighter blues and repeat between each.
- Apply Crumb Coat:
- Spread a thin layer of reserved white buttercream over the cake and chill for 20 minutes to seal in crumbs and set the structure.
- Frost and Decorate Ombre:
- Frost the cake with dark blue buttercream, blending in lighter shades upward for ombre. Smooth with an offset spatula, pausing to admire your gradient art.
- Add Gold Details:
- Brush edible gold leaf or gold dust (mixed with clear alcohol) onto the cake's surface for elegant streaks or edges. This is where the cake transforms into a showpiece.
- Chill and Serve:
- Refrigerate the decorated cake until ready to serve so the colors and accents set perfectly. Slicing into chilled layers gives sharp, clean cuts for serving.
 Save
Save Handing a slice to the newest graduate, I watched the shimmer of gold light up his smile—for a moment, everything stopped except the sweet flavors and the sense of achievement. The cake became a centerpiece, not just for dessert, but for cheering memories and sharing laughter with those we love.
Handling the Buttercream Blues
Streaking blue buttercream can feel like painting, and I learned to start with the darkest shade first, gently working lighter tones up the sides. Sometimes I pause just to check how the ombre blends or to fix an accidental fingerprint. Letting the buttercream chill for a few minutes makes blending easier, especially on humid days. Don't stress over perfect lines—the swirl of colors is what makes each cake unique. A light touch and patience can transform the finish from homemade to utterly sophisticated.
Gold Leaf Touches That Impress
Applying gold leaf or dust is best done with a small, soft brush; I keep my hand steady and dab gently, letting the gold catch the light around the cake's edges. A little bit goes a long way, so I resist the urge to overload. If using gold dust, mixing with a drop of vodka or lemon extract creates a striking, painted effect. This simple step makes every celebration feel a bit more regal. Check that decorations are food-safe before you splurge on the shimmer.
Ombre Layer Troubleshooting
Sometimes, the gradient doesn't turn out crisp—don't panic, just slice strategically and plate the best layers front and center. If crumb coats catch stray cake bits, patch gently with extra buttercream before chilling. Even uneven layers can be covered with piped swirls or gold flecks. Remember, nobody at the party notices little imperfections—they're chasing flavor and fun.
- Chill the cake before slicing for sharp, clean layers.
- Don't rush the coloring—let the blue shades sit for depth.
- Keep extra buttercream on hand for quick fixes.
 Save
Save May your graduation cake be the highlight of the celebration, sparking joy as much in the making as in the eating. Here's to memorable milestones and layers of flavor worth savoring.
Kitchen Tips & Answers
- → How do I achieve the ombre effect with cake layers?
Divide the batter into separate bowls and tint each with increasing amounts of blue gel coloring for a gradient look.
- → What tips help the buttercream stay creamy and spreadable?
Use room-temperature butter, sifted powdered sugar, and add milk or cream gradually to reach the desired consistency.
- → Can I use more than three cake layers for a dramatic effect?
Yes, you can use four or five layers, tinting each progressively darker for a more intense ombre appearance.
- → How do I apply edible gold decoration?
Use edible gold leaf or mix gold dust with a small amount of clear alcohol to brush decorative streaks or edges.
- → Is there a vegetarian-friendly option for this cake?
This cake is suitable for vegetarians using the ingredients specified, including eggs and dairy-based buttercream.
- → What are some suggested pairings for this cake?
Serve with sparkling apple cider or Prosecco, and optionally decorate with chocolate stars or fresh berries.