Save
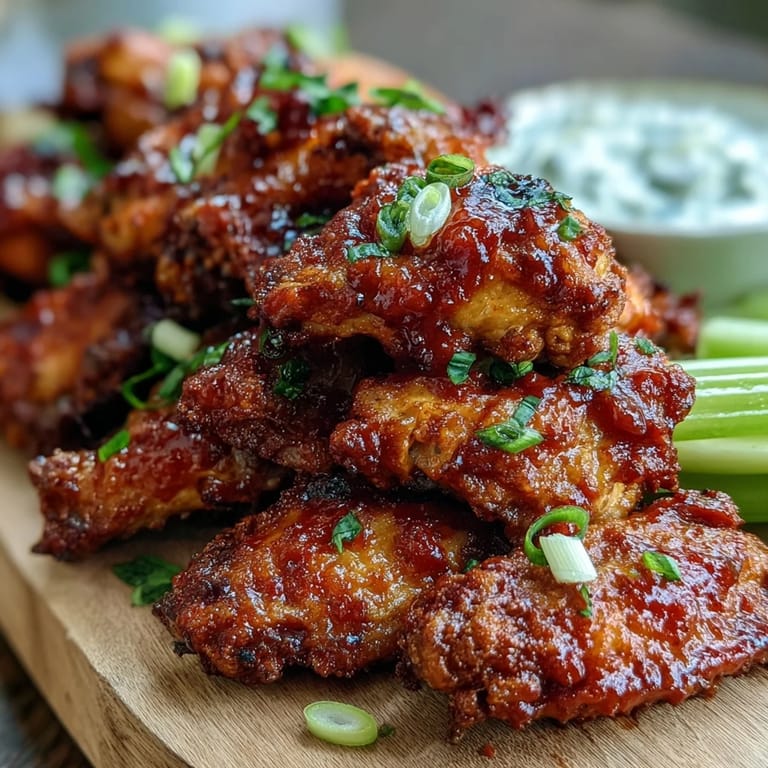
Save My neighbor knocked on the door one Sunday afternoon with a plate of the crispiest chicken wings I'd ever seen, still steaming and golden. She wouldn't share her method at first, just smiled and said, "You'll figure it out." That challenge stuck with me for weeks until I realized the secret wasn't some fancy technique but rather patience with the marinade and respect for the oil temperature. Now these wings are what I reach for when I want to prove I can fry something better than any restaurant, and honestly, the real victory is watching people's faces when they bite through that shattering crust.
I made these for a game night that started as a "just a few people" situation and somehow turned into ten hungry friends crammed into my kitchen. Someone forgot to bring the appetizers, so suddenly my experimental wing batch became the main event. Watching people reach for thirds without a word, just pure satisfaction on their faces, told me everything I needed to know about whether I'd figured out my neighbor's secret.
Ingredients
- Chicken wings (1.2 kg or 2.5 lbs), separated at joints with tips removed: Quality matters here because you're tasting mostly chicken; buy from a butcher if you can and ask them to separate the flats from the drums so they cook evenly.
- Buttermilk (1 cup): This is non-negotiable for tenderness; the acidity breaks down proteins while the fat keeps meat juicy, and yes, it actually makes a measurable difference.
- Salt (1 teaspoon): Seasons the marinade deep into the meat rather than just sitting on the surface.
- Black pepper (1/2 teaspoon): Fresh cracked is best if you have a grinder.
- Garlic powder (1 teaspoon): Adds savory depth that fresh garlic can't deliver when fried.
- Onion powder (1 teaspoon): Works alongside garlic to build umami layers.
- Paprika (1/2 teaspoon): Brings color and a gentle smoky note to the coating.
- Cayenne pepper (1/2 teaspoon, optional): Start small here unless you love heat; you can always add more in the sauce.
- All-purpose flour (1.5 cups): The base of your crispy coating; don't skip the cornstarch as it's what creates that shattering crust.
- Cornstarch (1/2 cup): This is the secret ingredient that every restaurant uses; it crisps up in ways regular flour simply cannot.
- Baking powder (1 teaspoon): Creates tiny air pockets that make the coating light and crunchy rather than dense.
- Sunflower or peanut oil for deep frying: Use neutral oils with high smoke points; avoid olive oil entirely as it will make your wings taste wrong.
- Hot sauce like Franks RedHot (1/3 cup for Buffalo): The foundation of Buffalo sauce; mild but flavorful enough to build on.
- Unsalted butter, melted (2 tablespoons for Buffalo): Richness that balances the heat and brings everything together smoothly.
- Honey (1 teaspoon for Buffalo): A tiny bit of sweetness that makes Buffalo sauce addictive without being obvious.
- Thai sweet chili sauce (1/2 cup): Buy quality; cheap versions taste thin and chemical-y.
- Lime juice (1 tablespoon for Thai): Brightness that cuts through the sweetness perfectly.
- Fish sauce (1 teaspoon for Thai, optional): Adds savory depth if you're comfortable with it; skip it if the smell bothers you.
- BBQ sauce (1/2 cup): Your favorite variety works; I like a slightly spicy one but that's personal preference.
- Fresh chives or scallions, sliced (optional garnish): The bright green makes wings look restaurant-quality and adds a fresh bite at the end.
- Celery sticks and blue cheese or ranch dressing (optional sides): The cool crunch and creamy dip balance the heat and richness beautifully.
Tired of Takeout? 🥡
Get 10 meals you can make faster than delivery arrives. Seriously.
One email. No spam. Unsubscribe anytime.
Instructions
- Give yourself time with the buttermilk soak:
- Toss your wings with buttermilk, salt, pepper, garlic powder, onion powder, paprika, and cayenne in a large bowl, then cover and refrigerate for at least 30 minutes; overnight is even better because the acid keeps working on the meat. The longer you wait, the more tender everything becomes, so don't rush this step if you have the time.
- Mix your dry coating in a separate bowl:
- Combine flour, cornstarch, and baking powder in another bowl and whisk it together really well so the leavening agent distributes evenly. This is quick but important for getting that light, crispy texture.
- Coat and rest your wings:
- Pull wings from the marinade one at a time, let excess buttermilk drip off, then dredge thoroughly in the flour mixture, pressing gently so it adheres and doesn't fall off during frying. Place coated wings on a wire rack and let them rest for 10 minutes before frying; this helps the coating set and stay attached.
- Heat your oil to the right temperature:
- Fill a heavy pot or deep fryer with oil to about 5 cm (2 inches) depth and bring it to exactly 175°C (350°F); use a thermometer and trust it because temperature is everything here. Too cool and your wings absorb oil and become greasy; too hot and the outside burns before the inside cooks.
- Fry in batches without crowding:
- Work in batches so wings have space to move around freely and fry for 8 to 10 minutes, turning occasionally with tongs until they're golden brown and crispy all over. You'll hear a shift in the sizzle sound when they're getting close to done, and that's a good sign to start checking.
- Drain and let them rest for a moment:
- Lift wings out with a slotted spoon and drain them on a wire rack set over paper towels; this lets steam escape and keeps them crunchy rather than getting soggy as they cool. Even 5 minutes makes a difference.
- Make your sauces while wings are still warm:
- For Buffalo, whisk hot sauce with melted butter and honey; for Thai, combine sweet chili sauce with lime juice and fish sauce if using; for BBQ, just use it as is. Do this while wings are resting so everything comes together at the same moment.
- Toss and serve immediately:
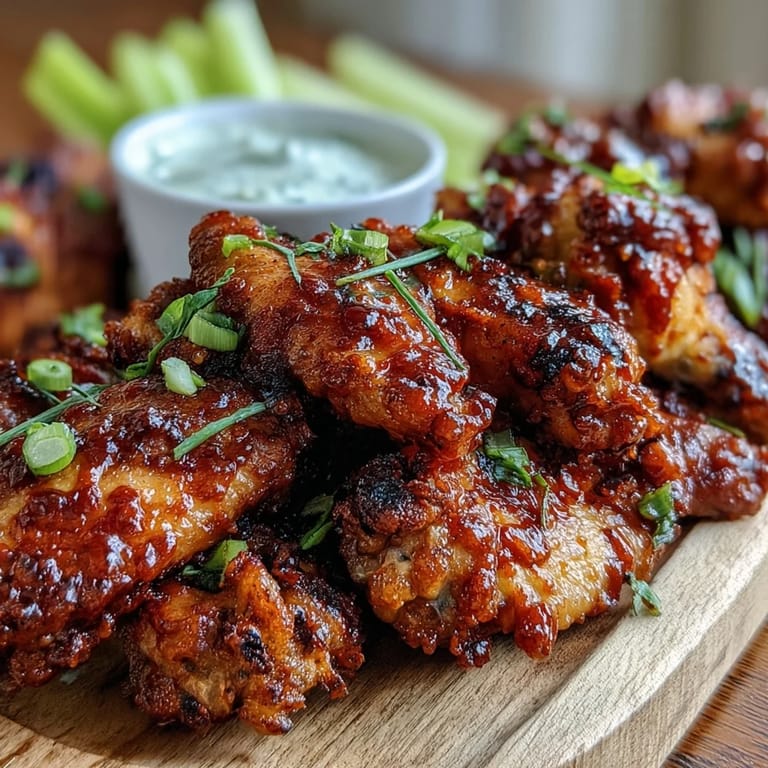
- Divide wings into three groups and toss each group with one sauce, or set sauces on the side for dipping based on what your crowd prefers. Garnish with sliced chives or scallions and serve alongside celery sticks and blue cheese or ranch dressing.
 Save
Save My first batch didn't turn out perfect, and I remember standing there frustrated, wondering what went wrong, until my roommate pointed out that the wings tasted amazing even if they looked a bit pale. That's when I understood that home-cooked doesn't have to match restaurant presentation to be delicious, but once I figured out the oil temperature and batch size, suddenly they looked amazing too. Now these wings have become the thing people text me about days later asking me to make them again.
The Secret to Crispy Wings
The difference between soggy and spectacular comes down to cornstarch in your coating and trusting your thermometer more than your intuition. Restaurants know something home cooks often skip: cornstarch creates a completely different texture than flour alone, something almost shattering that flour just cannot achieve. Once I started using a 3:1 flour-to-cornstarch ratio with baking powder, every batch came out with that shattering crust that makes people stop mid-conversation to comment on it.
Why Marinade Time Actually Matters
I used to think 30 minutes was enough, but then I marinated wings overnight once and couldn't stop noticing how much more tender and flavorful they were. Buttermilk isn't just liquid coating; the lactic acid actively breaks down muscle proteins and helps the meat retain moisture during frying, which is why homemade buttermilk-brined chicken tastes so much better than anything dry. Even adding just an extra hour to your marinade time changes the final result enough that you'll notice it.
Sauce Pairing and Serving Strategy
Offering three sauce options isn't just generous; it's smart because it lets people choose their own adventure without you having to make decisions for them. The Buffalo sauce works for traditional wing fans, Thai chili appeals to people who like something sweet and spicy, and BBQ is comfort in a bowl for the undecided. Pro move: if you're nervous about committing to one sauce, fry the wings plain and toss them with sauce right before serving, then set extra sauce on the side for people who want more.
- Buffalo sauce benefits from being warm when you toss it, so make it while wings drain.
- Thai sauce is better at room temperature and actually tastes better the next day as flavors meld.
- Always serve celery and ranch or blue cheese because the cool creaminess is what makes wings craveable.
 Save
Save These wings have somehow become the thing I make when I want to feel proud of what comes out of my kitchen, and somehow they always deliver. Whether it's game day or just a random Tuesday when friends stop by, crispy wings and cold drinks remind me that sometimes the simplest food, made with real attention, becomes the kind of meal people remember.
Kitchen Tips & Answers
- → Can I bake these wings instead of frying?
Yes, you can bake them at 220°C (425°F) for 40-45 minutes, flipping halfway through. However, frying produces a crispier texture.
- → How do I know when the oil is at the right temperature?
Use a kitchen thermometer to reach 175°C (350°F). Without a thermometer, drop a small piece of bread into the oil; it should brown in about 60 seconds.
- → Can I prepare the wings ahead of time?
Absolutely. Marinate the wings up to 24 hours in advance for deeper flavor. You can also coat them and refrigerate for up to 2 hours before frying.
- → What makes these wings extra crispy?
The combination of cornstarch and baking powder in the coating creates maximum crispiness. The buttermilk marinade also helps the coating adhere better.
- → How do I store leftover wings?
Store in an airtight container in the refrigerator for up to 3 days. Reheat in a 200°C (400°F) oven for 10-12 minutes to restore crispiness.
- → Can I use frozen chicken wings?
Yes, but thaw them completely and pat dry before marinating. Excess moisture will prevent proper crisping and can cause oil splattering.