 Save
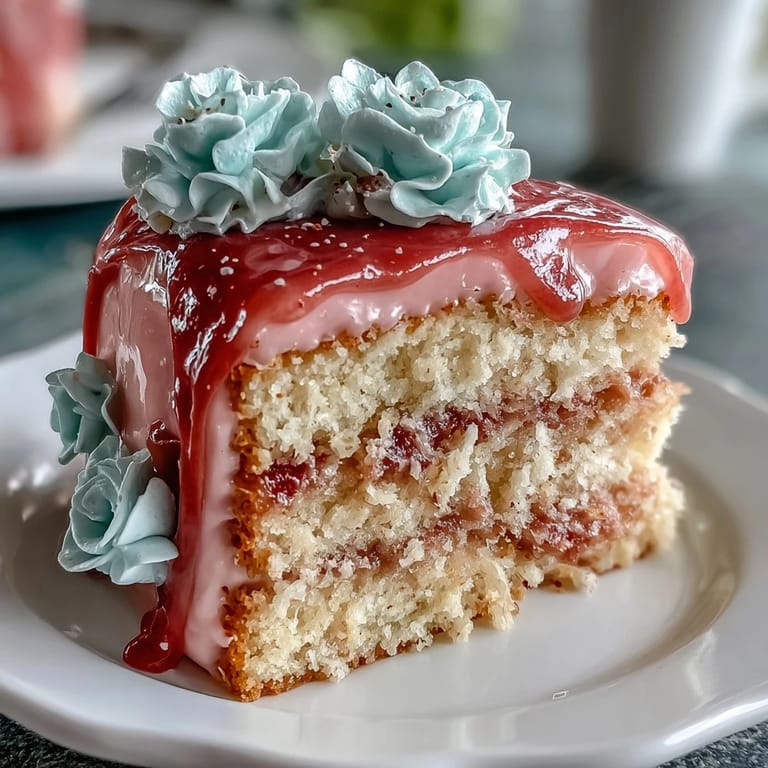
Save My sister called me three weeks before Mother's Day in a panic—she'd promised to bring dessert to our family gathering but had no idea what to make. I found myself at my kitchen counter at midnight, sketching out a cake design on the back of an envelope, imagining something that felt both elegant and warm. The vision was clear: layers of tender vanilla cake cradled in buttercream that shifted from deep rose to pale blush, topped with delicate flowers that looked like they'd been plucked from a garden. When I finally baked it the next morning, the house filled with that vanilla-butter smell that makes you feel capable of anything.
The week after that midnight planning session, I made it for real at my mom's house while she was out running errands. My hands were shaking slightly as I piped on the last flowers—partly from coffee, mostly from wanting it to be perfect. When she walked in and just stood there for a moment without saying anything, I knew I'd gotten it right. She ended up taking a photo before we even cut into it, which tells you everything.
Ingredients
- All-purpose flour: The foundation of your cake's tender crumb—make sure it's fresh and stored properly, as old flour can make everything dense.
- Baking powder: This is your lift, so don't skip it or reduce it thinking you're being clever.
- Unsalted butter, room temperature: Room temperature is non-negotiable here; cold butter won't cream properly and you'll end up with a dense cake instead of the light, airy texture you're chasing.
- Granulated sugar: The sweetness and structure combined—this amount is balanced so the cake isn't cloying.
- Large eggs, room temperature: Just like the butter, temperature matters because it helps everything emulsify smoothly into the batter.
- Pure vanilla extract: Don't reach for the imitation stuff; the real thing is worth the few extra cents and completely changes the flavor profile.
- Whole milk, room temperature: The moisture that keeps these layers from being crumbly, and the temperature ensures it doesn't shock the batter.
- Powdered sugar, sifted: Sifting removes lumps that will show up as graininess in your buttercream—I learned this the hard way.
- Pink food coloring (gel preferred): Gel coloring is concentrated so you get vibrant shades without thinning out your buttercream, which happened to me once and nearly ruined the whole thing.
- Edible flowers: Violets, pansies, and rose petals work beautifully; buy them from specialty food stores or farms you trust, never use florist flowers.
Tired of Takeout? 🥡
Get 10 meals you can make faster than delivery arrives. Seriously.
One email. No spam. Unsubscribe anytime.
Instructions
- Set up your stations and prep:
- Preheat your oven to 350°F and while it's warming, grease those three cake pans really thoroughly—I use a combination of butter and parchment paper because I've had cakes stick before and it's heartbreaking. Get your eggs and milk and butter out on the counter now so they reach room temperature while you're gathering everything else.
- Combine your dry ingredients:
- Whisk together the flour, baking powder, and salt in a medium bowl—this mixes everything evenly so you don't get random pockets of baking powder that taste metallic. Set it aside and don't overthink this step.
- Cream butter and sugar until fluffy:
- This should take about 3 to 4 minutes on high speed, and you'll notice the mixture goes from dense and yellow to pale and airy. When it's ready, it should look almost like frosting already, which is how you know you've done it right.
- Add your eggs one at a time:
- Beat each egg in fully before adding the next one, then add your vanilla extract and beat for another 30 seconds. If you rush this and throw all the eggs in at once, they won't incorporate as smoothly.
- Alternate flour and milk:
- Add about a third of the flour mixture, mix until combined, then a third of the milk, then keep going—flour, milk, flour, milk, flour. Always start and end with flour so the mixture stays stable, and stop mixing as soon as there are no white streaks, because overmixing toughens the crumb.
- Divide and bake:
- Distribute the batter evenly among your three prepared pans—I use an ice cream scoop so each layer is the same thickness. Bake for 25 to 30 minutes until a toothpick comes out clean, then let them cool in the pans for 10 minutes before turning out onto racks.
- Make your buttercream:
- Beat the room-temperature butter on high speed for about 2 to 3 minutes until it's pale and creamy, then gradually add your sifted powdered sugar on low speed so you don't create a powdered sugar cloud in your kitchen. Add the vanilla and milk, then beat on high for 3 minutes until it's fluffy and light.
- Create your ombre effect:
- Divide the buttercream into four bowls—leave one white and tint the other three with increasing amounts of gel food coloring, starting with just a tiny drop to create a pale pink, then adding more for medium, then even more for your darkest shade. Do this slowly because gel coloring is potent and you can always add more but you can't take it out.
- Layer and frost your cake:
- Place your first cake layer on your serving plate, spread the darkest pink buttercream on top, then add the second layer and spread the medium pink, then the final layer and top with your light pink. Use the remaining white buttercream to coat the sides and create that smooth finish you're after.
- Smooth and blend:
- Use an offset spatula to smooth out your buttercream, working slowly and letting the warmth of the knife do the work. If you want an extra-blended ombre effect, use a bench scraper at an angle to blend the colors where they meet, which takes it from pretty to absolutely stunning.
- Decorate and chill:
- Add your edible flowers right before serving so they stay fresh and vibrant—press them gently into the buttercream or scatter them across the top however feels right. Chill the whole cake for at least 30 minutes so the buttercream sets and you get clean slices when you cut.
 Save
Save There's a moment after you finish decorating, when the cake is chilling and you step back to look at what you've made, that feels almost ceremonial. You're not just making dessert—you're making something that will be remembered, that will sit in the center of the table and make people smile before they even taste it.
The Vanilla Sponge Secret
The magic of this cake lives in how the vanilla cake itself is baked. I've noticed over the years that a truly great vanilla cake isn't about fancy ingredients—it's about technique and patience. The key is the creaming step, where you beat butter and sugar together until it's pale; this incorporates air that creates the lift you're chasing. When you add the flour and milk alternately, you're being gentle enough to preserve those air bubbles while still distributing everything evenly. I once got impatient and tried to speed this up by mixing everything faster, and the cake came out dense and tight, which taught me that speed is the enemy here.
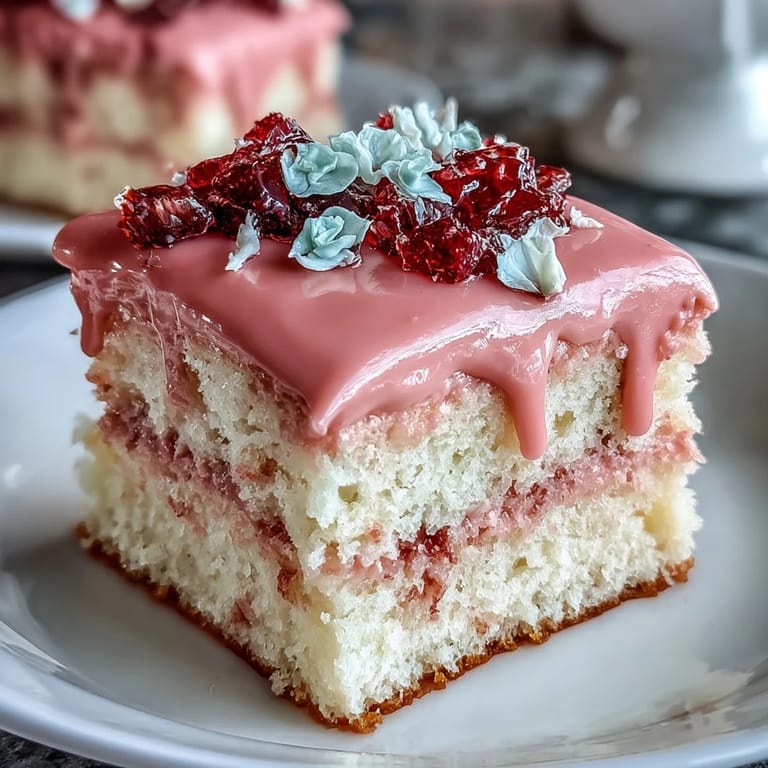
Building the Perfect Ombre
The ombre effect seems intimidating until you realize it's just a matter of having four bowls of buttercream in gradually different shades. I spent a lot of mental energy worrying about whether the colors would blend smoothly, but here's what I discovered: if you frost each layer with its designated shade and then use white buttercream on the sides, the eye naturally follows the gradient from layer to layer. The magic happens in the layering itself, not in any special blending technique. One time I tried to hand-blend the colors on the side of the cake with a small palette knife, and honestly, it looked worse than just letting each section be its own shade—sometimes simplicity is the answer.
Flowers and Final Flourishes
The flowers are what make people stop and stare, so choose them thoughtfully and add them at the last possible moment. Fresh edible flowers like pansies, violets, and rose petals work beautifully, but you have to source them from somewhere you trust—a farmer's market, a specialty food store, or a farm that grows specifically for culinary use. Never use florist flowers because they're often treated with pesticides and chemicals that absolutely should not go near anyone's mouth. I learned this the hard way when I almost grabbed some beautiful roses from a grocery store floral section without thinking.
- Add flowers right before serving so they stay perky and don't wilt into the buttercream.
- You can scatter them casually across the top or press them gently into the frosting for a more intentional look.
- If you're nervous about edible flowers, you can skip them entirely and the cake is still stunning.
 Save
Save This cake has become my go-to for celebrations because it's beautiful enough to feel special but approachable enough that I can actually make it without stress. Every time I bake it, I think about that moment when my mom walked in and just smiled, and I remember why we bake for the people we love.
Kitchen Tips & Answers
- → How is the pink ombre effect achieved?
The buttercream is divided into portions and tinted with increasing amounts of pink food coloring, creating graduated shades that blend as they’re layered on the cake.
- → What types of flowers can be used for decoration?
Edible flowers like violets, pansies, and rose petals add a delicate touch, while non-edible toppers can be used but should be removed before serving.
- → How can I ensure the sponge layers are moist?
For extra moisture, brush cooled layers with simple syrup before spreading the buttercream.
- → Can I prepare the cake in advance?
Yes, assemble and chill the cake for at least 30 minutes before slicing to allow the buttercream to set and ensure clean cuts.
- → Are there any allergen considerations?
This cake contains wheat, eggs, and dairy. Additionally, edible flowers may cause sensitivities in some individuals, so check carefully.