 Save
Save My daughter spotted this Easter Bunny cake in a magazine and wouldn't stop talking about it for weeks. There's something magical about turning a simple layer cake into a creature that makes kids pause mid-sugar-rush just to admire it before devouring it. I'd never shaped a cake into an animal before, so I approached it with equal parts excitement and nervous energy. When those two halves stood up as ears, catching the kitchen light just right, I understood why she'd been so enchanted. This became the cake that proved you don't need fancy equipment to create something unforgettable.
I made this for an Easter gathering where I was the only one bringing dessert, which meant I couldn't hide behind anyone else's baking. My hands were shaking slightly as I positioned those ears, worried the whole structure would topple. When we brought it to the table and the room went quiet for a second, then erupted in delighted laughter and photos, I realized the imperfect charm of a homemade bunny cake beats a store-bought perfection every single time.
Ingredients
- All-purpose flour (2 1/2 cups): This is your structural foundation; don't sift unless you want a denser crumb, and measure by spooning and leveling rather than scooping straight from the bag.
- Baking powder and baking soda (2 1/2 tsp and 1/2 tsp): These work together to give you a tender, cloud-like cake that holds its shape when you're cutting and positioning it.
- Unsalted butter (1 cup for cake, 1 cup for frosting): Room temperature is non-negotiable here; cold butter won't cream properly and you'll end up with a dense crumb instead of that light, fluffy texture.
- Granulated sugar (1 3/4 cups): This sweetness dissolves into the batter and helps create that tender crumb structure.
- Eggs (4 large, room temperature): Cold eggs won't blend smoothly with the butter mixture, so pull them out before you start mixing.
- Vanilla extract (1 tbsp): A small amount transforms the whole flavor profile from plain to bakery-quality.
- Whole milk (1 cup): The liquid that brings everything together and keeps the cake moist without being dense.
- Powdered sugar (4 cups): Sift this before measuring to avoid lumps in your frosting.
- Sweetened shredded coconut (2 cups): This becomes your bunny's fur and covers a multitude of frosting sins.
- Jelly beans (assorted): Your decorative elements should feel intentional, so choose colors that match your table or plate.
Tired of Takeout? 🥡
Get 10 meals you can make faster than delivery arrives. Seriously.
One email. No spam. Unsubscribe anytime.
Instructions
- Set yourself up for success:
- Preheat your oven to 350°F and get your pans ready with a light grease and flour coating; cold pans are your enemy when you're trying to bake evenly. Pull your eggs out of the fridge now if you haven't already, so they're at room temperature by the time you need them.
- Dry ingredients meet:
- Whisk together the flour, baking powder, baking soda, and salt in a medium bowl; this prevents lumps and ensures the leavening agents are evenly distributed throughout the batter. Set it aside and trust that this small step prevents dry spots in your finished cake.
- Cream the foundation:
- Beat the softened butter and sugar together until the mixture looks pale, fluffy, and almost mousse-like; this usually takes about three to four minutes with an electric mixer. This step is where the magic happens—you're aerating the butter, which gives your cake that tender crumb you're after.
- Marry the wet and dry:
- Add eggs one at a time, beating well after each addition, then mix in the vanilla extract. Alternate adding the flour mixture and milk to the butter mixture, starting and ending with flour; this prevents overmixing, which would develop gluten and toughen your cake.
- Get them baking:
- Divide the batter evenly between your prepared pans and smooth the tops slightly. Bake for thirty to thirty-five minutes, until a toothpick inserted in the center comes out clean or with just a few moist crumbs clinging to it.
- Cool with patience:
- Let the cakes cool in their pans for ten minutes so they set slightly, then turn them out onto a wire rack to cool completely; this prevents them from cracking when you're shaping them later.
- Whip your frosting:
- Beat the softened butter until it's creamy and pale, then gradually add the sifted powdered sugar, a cup at a time. Add vanilla and enough milk, one tablespoon at a time, until you reach a consistency that's spreadable but not runny.
- Architect your bunny:
- Place one whole cake round on your serving platter as the bunny's body. Cut the second cake round in half and stand those semicircles upright at one end to create the bunny's head and back; frosting acts as your structural glue here.
- Shape the details:
- Using a serrated knife, carefully cut ear shapes from the remaining cake scraps, then cut out two small paw shapes. Attach everything to the bunny's body with a generous schmear of frosting, building your bunny like you're constructing a puzzle.
- Frost like you mean it:
- Cover the entire bunny cake generously with frosting, making sure there are no gaps where cake shows through. Don't worry about making it smooth or perfect—the coconut fur will hide any lumps or streaks.
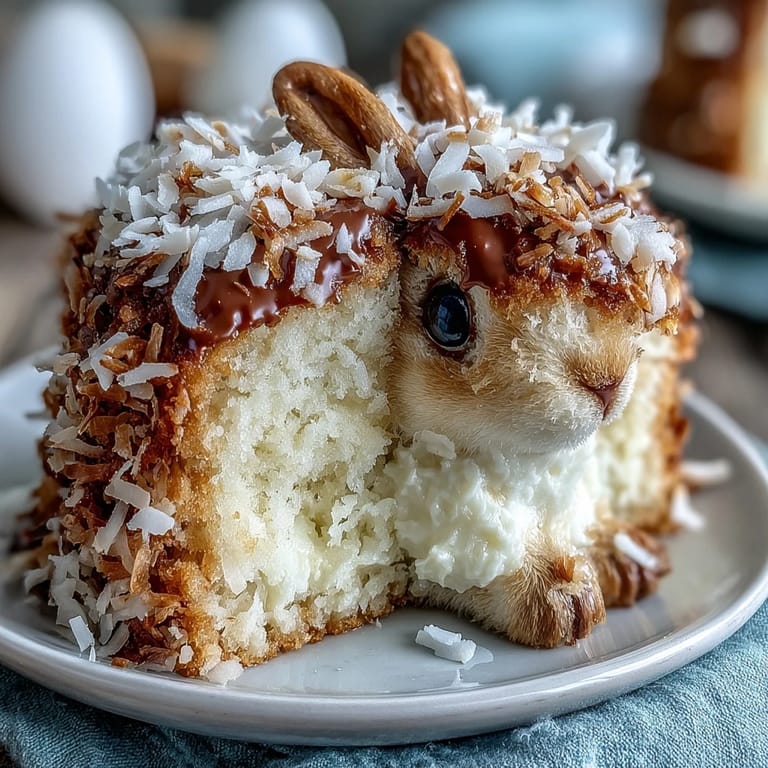
- Add the fur coat:
- Press the shredded coconut all over the frosted cake, using your hands to gently but firmly pat it into place. The texture will transform your cake into something that actually looks fuzzy and adorable.
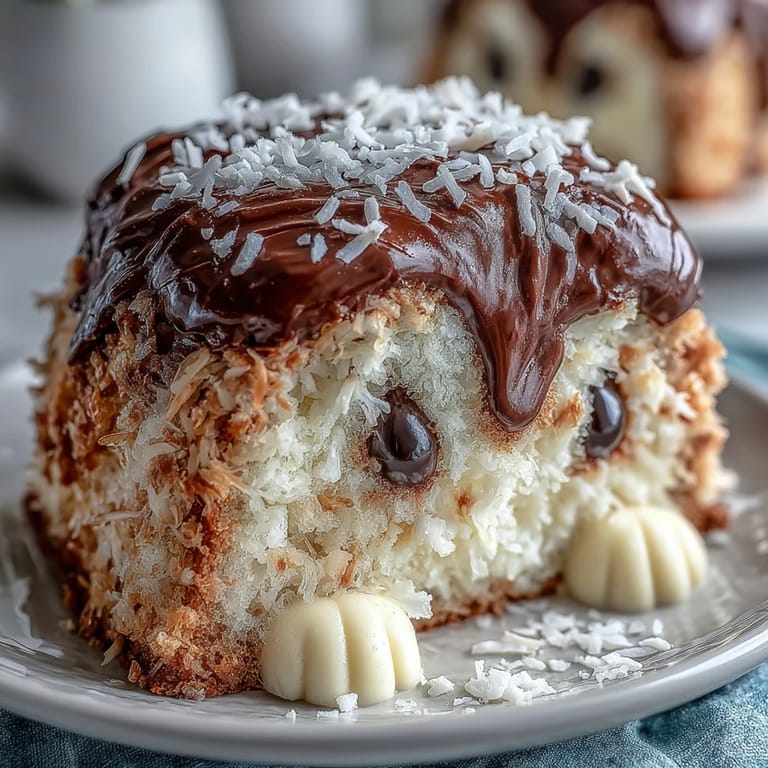
- Bring your bunny to life:
- Place the large pink jelly bean at the bunny's rear for a tail, add white and pink jelly beans to the paws for toe pads, and use mini chocolate chips or black jelly beans for eyes. If you're feeling artistic, tint some coconut pink with food coloring and sprinkle it on the ears for extra detail.
- Chill and admire:
- Refrigerate the finished cake until you're ready to serve; the cold will set the frosting and make everything more structurally sound.
 Save
Save The moment I watched my daughter carefully place each jelly bean paw pad, her tongue poking out in concentration, I realized this cake had become more than dessert. It was her art project, her masterpiece, something she'd proudly tell everyone at school she'd helped create. That's when baking stops being about following recipes and becomes about creating memories someone carries for years.
The Cake Structure that Holds
The first time I shaped this cake, I was convinced the whole thing would collapse like a house of cards. But a properly baked, completely cooled cake is sturdier than you'd think, and frosting acts as surprisingly effective structural glue. The key is patience—rushing the cooling step is where most people run into trouble. I learned to frost only after the cake was genuinely cool to the touch, almost cold, which made the entire shaping process feel less like a high-wire act and more like something manageable.
Why Coconut is Your Secret Weapon
Coconut isn't just a decoration; it's problem-solving in shredded form. Frosting won't look perfectly smooth on a shaped cake—there will be small cracks, uneven patches, and spots where your frosting knife left streaks. Coconut forgives all of this with joyful generosity. The first time I pressed that coconut onto an imperfect frosting job, I felt like I'd discovered a cheat code. Now I embrace the fact that rustic, slightly imperfect, fur-covered bunnies are actually more charming than anything that looks artificially perfect.
Flavor Variations and Personal Touches
The vanilla cake base is a blank canvas that welcomes experimentation. I've tried adding a half teaspoon of almond extract for subtle sophistication, and I've seen people add lemon zest to the batter for brightness. You could toast your coconut lightly before pressing it on for deeper flavor, or use pink or tinted coconut if you're committed to a color scheme. The jelly bean selections matter too—I once chose lavender-colored jelly beans for the paws and it somehow made the whole cake feel more spring-forward and less Easter-specific.
- Add half a teaspoon of almond or lemon extract to the batter for a sophisticated flavor twist.
- Toast the coconut lightly in a dry pan before applying it for deeper, nuttier flavor notes.
- Choose jelly bean colors intentionally to match your table, theme, or the birthday child's favorite colors.
 Save
Save This bunny cake taught me that the best desserts are the ones that make people smile before they take a bite. Every time you make it, it's a small celebration—of spring, of effort, of the joy that comes from creating something whimsical with your own hands.
Kitchen Tips & Answers
- → How do I create the fluffy coconut fur effect?
Generously press sweetened shredded coconut onto the buttercream-frosted cake to mimic the texture of bunny fur.
- → What ingredients enhance the cake's flavor?
Vanilla extract in both batter and frosting adds rich aroma, while optional lemon or almond extracts can provide a subtle twist.
- → How are the bunny's paws and tail decorated?
Jelly beans of various colors form the tail and paw pads, while mini chocolate chips or black jelly beans serve as eyes for a playful look.
- → Can this be made ahead of time?
Yes, the cake can be baked and assembled in advance; chilling helps the frosting set and the decorations stay in place.
- → What tools are needed to shape the bunny?
Two 8-inch round pans, a serrated knife for cutting shapes, and spatulas for spreading frosting are essential for assembly.